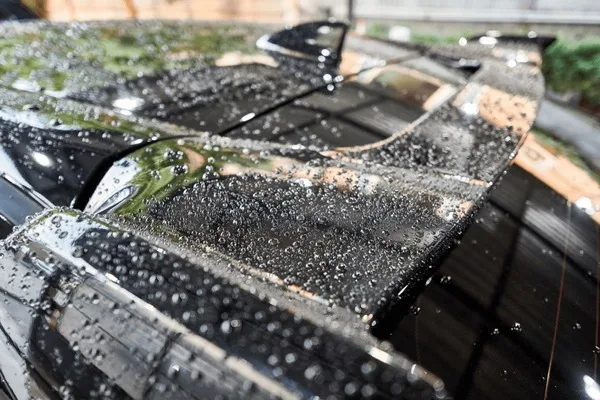
You've seen it happen. You walk out to your car in the morning, and there's a fine layer of dust settled across the hood, roof, and windshield. Maybe it's pollen.
Maybe it's construction dust from down the street. Your first instinct is to grab something and wipe it off. But that instinct is exactly what leads to swirl marks, micro-scratches, and a dull finish over time.
So what about blowing dust off my car instead? No contact means no scratches, right? The reality is more complicated.
As of 2026, clear coat hardness varies wildly between manufacturers. The wrong blowing technique can do just as much damage as a dirty rag. In our research, the key isn't whether you blow the dust off.
It's how you do it, and whether you should at all based on what kind of dust you're dealing with.
Is Blowing Dust Off Your Car a Good Idea or a Bad One?
It depends entirely on the dust and your paint.
Blowing dust off your car is a good idea when the dust is light, loose, and non-abrasive. Think pollen, light road dust from overnight parking, or fine haze after a dry day. In those cases, a gentle stream of air lifts the particles off the paint without physical contact.
That's a genuine win.
It's a bad idea when the dust is heavy, caked on, or contains abrasive particles like sand, silica, or construction debris. Here's why. When you blast air across a gritty surface, you're not lifting the dust cleanly.
You're pushing sharp particles across the clear coat at high speed. That's essentially microscopic sandblasting. Aggregate reviews from detailing communities report this as one of the most common hidden causes of premature clear coat wear.
The other risk is static buildup. Dry air, especially in low-humidity conditions, creates static electricity on the paint surface. That static pulls dust back onto the car the moment you stop blowing.
You end up where you started, sometimes with more dust than before.
The real question isn't "should I blow dust off my car?" It's "what kind of dust am I dealing with, and what's the safest way to handle it?"
What Kind of Dust Are You Actually Dealing With
Before you pick up any tool, assess the dust. This is the single most important step, and most people skip it.
Run your finger lightly across the surface. Don't press. Just a gentle swipe.
- If your finger leaves a clean streak and the dust feels like fine powder, you're dealing with light, loose dust. This is the best candidate for blowing.
- If your finger drags or you feel resistance, the dust has settled or bonded slightly. Blowing alone might not be enough.
- If you hear or feel any grit like tiny grains of sand, stop. That's abrasive dust. Do not blow it.
Here's a quick breakdown of common dust types and how to handle each one:
| Dust Type | Common Source | Safe to Blow? | Best Approach |
|---|---|---|---|
| Pollen | Trees, grass, seasonal | Yes | Gentle blow, then quick detailer |
| Light road dust | Overnight parking, garage | Yes | Blow from top down |
| Construction dust | Nearby building work | No | Rinseless wash or full wash |
| Sand / silica | Beach, desert, dirt roads | No | Full wash only |
| Ash | Wildfires, fireplaces | No | Rinseless wash with pH-neutral soap |
| Mud splatter | Rain on dirt roads | No | Pre-rinse with water first |
| Brake dust | Wheels only | No | Wheel cleaner, never blow onto paint |
The key insight is that not all dust is created equal. What looks like a harmless layer of gray powder could be silica particles from nearby construction that will absolutely scratch your clear coat. Take the extra 10 seconds to check.
The Big Question: Do You Blow, Wipe, or Wash?
Once you know what you're dealing with, the decision tree splits into three branches.
Branch 1: Blow it. This is for light, loose, non-abrasive dust only. You'll use a leaf blower, compressed air, or a dedicated car dryer. The goal is to remove the dust without touching the paint.
This is the fastest method and the safest for your clear coat when done correctly.
Branch 2: Wipe it with a waterless wash or quick detailer. This is for light to moderate dust that has settled but isn't gritty. You spray a lubricating product onto the surface and wipe gently with a high-quality microfiber towel. The lubricant lifts the dust off the paint so the towel never drags particles across the clear coat.
This is slower than blowing but more effective for bonded dust.
Branch 3: Wash it. This is for heavy dust, caked-on dirt, mud, or any abrasive particles. You need water. A rinseless wash works well for moderate dust.
A full two-bucket wash is better for heavy buildup. Never try to blow or dry-wipe abrasive dust. You will damage your paint.
Most people want to skip straight to Branch 1 because it's easy. But the right choice depends on your situation. If you're dealing with pollen on a ceramic-coated car, blowing is perfect.
If you're dealing with construction dust on a matte wrap, you need a full wash.
Decision Branch 1 — If It's Light Haze or Pollen
This is the scenario where blowing dust off your car works best. You wake up to a light coating of pollen or fine road dust. The car was clean yesterday, and now it looks like someone sprinkled powder across the hood.
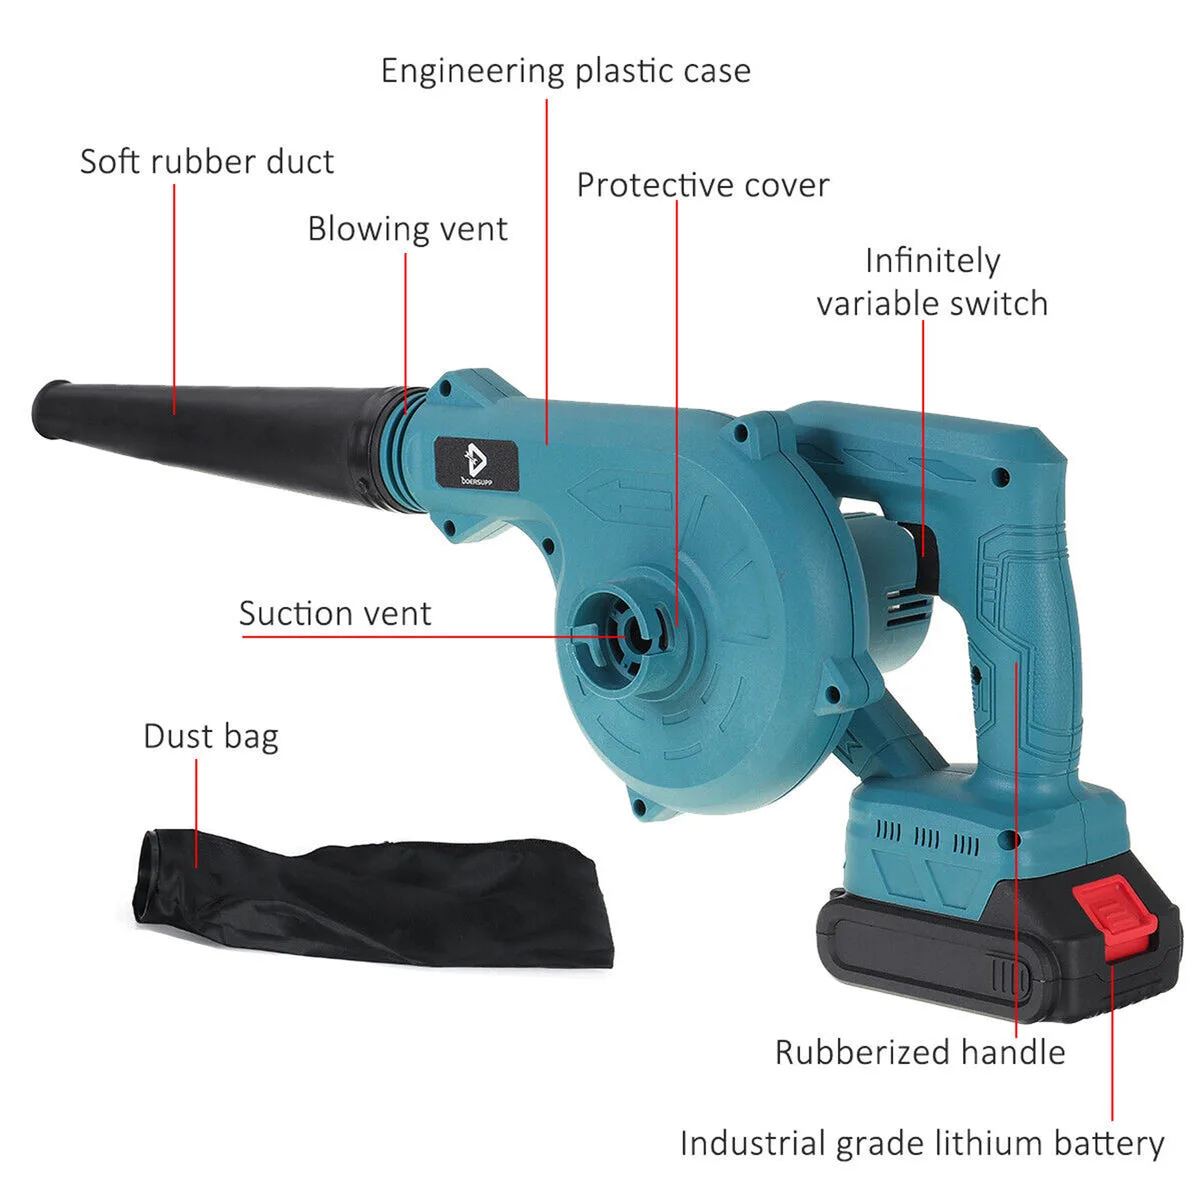
Step 1: Choose your tool. A cordless leaf blower is the most practical option. Look for one with variable speed control. You don't need full throttle.
A dedicated car drying blower works even better because it has a wider, softer nozzle and lower airspeed. Compressed air from a shop compressor works too, but you need a moisture trap to prevent oil mist from hitting your paint.
Step 2: Set the right speed. Start at the lowest setting that still moves the dust. For most cordless blowers, that's around 80 to 100 MPH. Higher speeds increase the risk of pushing particles across the paint and create more static buildup.
Step 3: Work from the top down. Start on the roof. Blow at a shallow angle, not straight down. The goal is to lift the dust and let the airflow carry it off the car.
Work your way down to the hood, trunk, and finally the sides.
Step 4: Mind the gaps. Avoid blowing directly into door jambs, window seals, hood gaps, or the trunk lid. You'll push dust into those crevices where it will settle and be harder to remove later. Angle the nozzle away from gaps.
Step 5: Follow up if needed. After blowing, check the surface. If there's any residue or light haze left, use a quick detailer spray and a clean microfiber towel. Spray the product onto the panel, not the towel, and wipe gently.
This catches any remaining particles without dragging them.
One thing to watch for. If the humidity is below 30 percent, static buildup will be worse. You might notice dust settling back onto the car within minutes.
In that case, consider using an anti-static detailer spray after blowing, or switch to a waterless wash method instead.
Decision Branch 2 — If It's Heavy or Caked-On Dust
Heavy dust looks different. It's not a light haze. It's a visible layer where you can see the texture on the surface.
Maybe you drove on a dirt road. Maybe you parked near a construction site for a few days.
Blowing this kind of dust off your car is risky. Here's why.
Heavy dust has had time to settle and bond to the paint. Moisture in the air, even a little, causes fine particles to adhere to the clear coat. When you blow air across that settled layer, you're not lifting it cleanly.
You're breaking the bond unevenly. Some particles stay put while others get pushed across the surface. That's a recipe for micro-scratches.
The better approach for heavy dust is a rinseless wash. This method uses a solution that encapsulates dirt particles and allows them to be lifted off the paint without scratching.
Step 1: Pre-spray. Mix your rinseless wash solution according to the manufacturer's instructions. Spray the entire car lightly to wet the dust. Let it sit for a minute to start breaking the bond.
Step 2: Use the two-towel method. One towel is your wash towel, soaked in the rinseless solution and wrung out. The other is your drying towel. Fold the wash towel into quarters.
Wipe one panel at a time using straight lines, not circles. Flip to a clean side after each panel.
Step 3: Dry immediately. Follow with the dry towel before the solution evaporates. This prevents water spots and leaves a clean finish.
If the dust is extremely thick or has been sitting for days, skip the rinseless wash and go straight to a full two-bucket wash with a pressure washer or hose. Use a quality car wash shampoo and a microfiber wash mitt. The extra water volume helps flush away particles.
The bottom line for heavy dust: blowing is not your friend. Water is.
Decision Branch 3 — If It's Abrasive (Sand, Silica, Ash, Construction Dust)
This is the branch where you put the blower down and walk away.
Abrasive dust is different from regular dust in one critical way. The particles are hard and sharp. Sand, silica from construction sites, volcanic ash, and certain types of industrial fallout all share this trait.
Under a microscope, these particles look like broken glass. When you blow air across them, you're dragging tiny razor blades across your clear coat.
Our research into paint failure modes shows that abrasive dust is a leading cause of clear coat thinning on cars parked near construction zones or dirt roads. The damage is cumulative. Each time you blow or wipe abrasive dust, you remove a microscopic layer of clear coat.
Over months and years, the clear coat becomes dull, thin, and eventually fails.
What to do instead. If you confirm abrasive dust, your only safe option is a full contact wash with plenty of water.
Step 1: Pre-rinse thoroughly. Use a pressure washer or a hose with a nozzle. Spray the car from top to bottom. The goal is to flood the surface and carry away loose particles before anything touches the paint.
Spend at least two minutes on this step.
Step 2: Foam pre-soak. Apply a thick layer of car wash foam using a foam cannon or foam gun. Let it dwell for three to five minutes. The foam encapsulates dirt particles and lifts them off the surface.
This is critical for abrasive dust because it reduces the amount of grit your wash mitt will encounter.
Step 3: Two-bucket wash. Use one bucket for soapy water and one for rinsing your mitt. Dip the mitt in the soap bucket, wash one panel, rinse the mitt in the clean water bucket, then reload with soap. This prevents trapped grit from being dragged across the paint.
Step 4: Dry with a clean microfiber towel. Use the two-towel method. One towel for initial drying, one for final buffing. Never let the car air dry, especially if you have hard water.
If you deal with abrasive dust regularly, consider paint protection film (PPF) on the front-facing panels. PPF adds a sacrificial layer that takes the damage instead of your clear coat. It's not cheap, but it's cheaper than a respray.
The Right Tools and Settings for Paint-Safe Blowing
If you've confirmed that your dust is light and non-abrasive, you need the right equipment. Not all blowers are created equal.
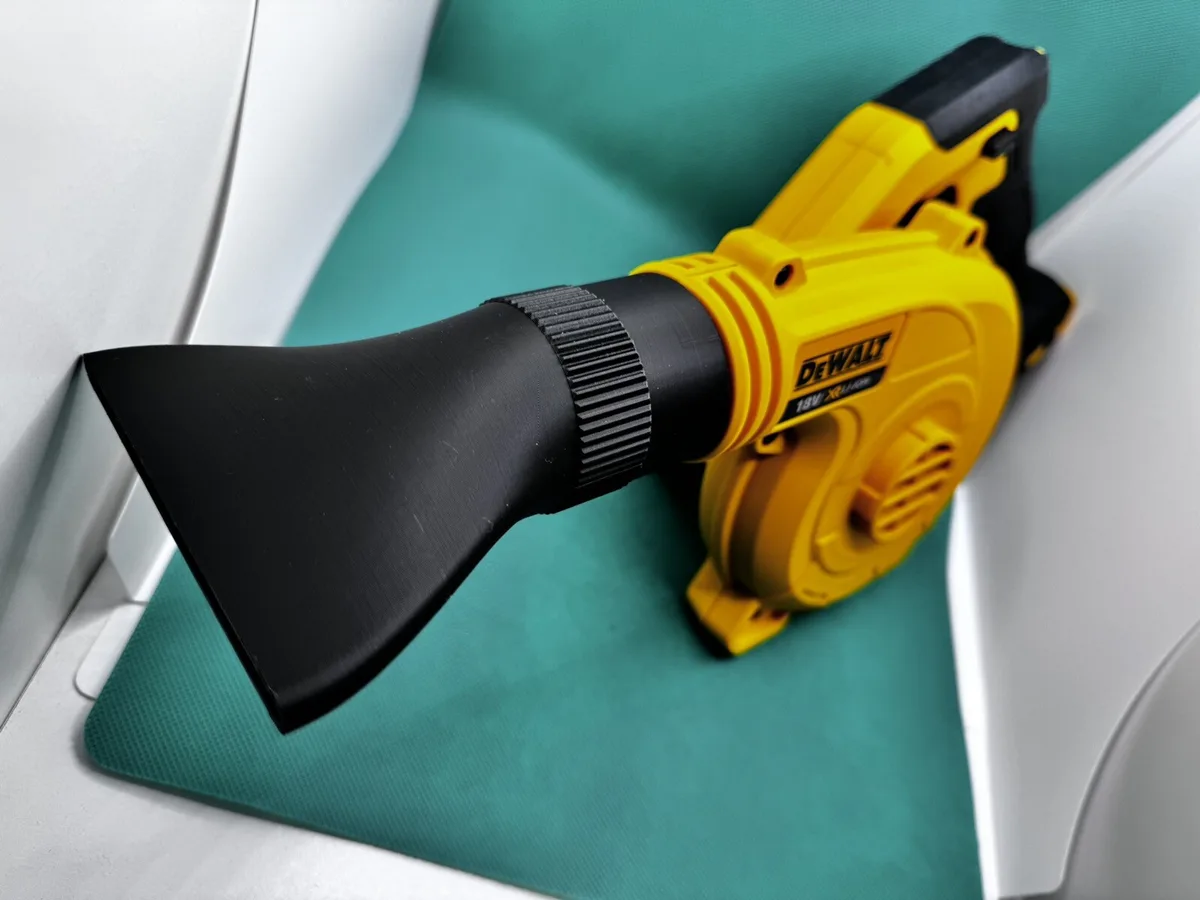
Leaf blowers vs. dedicated car dryers. A standard leaf blower works in a pinch, but it has drawbacks. The nozzle is usually narrow, which concentrates the airflow into a high-speed jet. That jet can be too aggressive for paint, especially at close range.
Dedicated car drying blowers have wider, softer nozzles that spread the air over a larger area. They also tend to have lower maximum airspeeds, which is a benefit for dust removal.
Here's a comparison of common tool options:
| Tool | Typical Airspeed | Best For | Watch Out For |
|---|---|---|---|
| Cordless leaf blower | 100-150 MPH | Light dust, pollen | Narrow nozzle, battery life |
| Corded electric blower | 120-180 MPH | Longer sessions | Cord management, heavier |
| Gas leaf blower | 150-200+ MPH | Heavy debris | Exhaust fumes on paint, noise |
| Dedicated car dryer | 80-120 MPH | Paint-safe dust removal | Higher cost, less versatile |
| Shop compressor with blow gun | Variable (60-90 PSI) | Tight spots, crevices | Moisture in air lines, noise |
The critical settings. No matter which tool you use, follow these parameters.
- Nozzle distance: Keep the nozzle at least 6 to 12 inches from the paint. Closer than 6 inches and the air pressure can dent soft trim or force dust into the clear coat.
- Airspeed: Stay under 150 MPH for paint. Above that, you risk pushing particles across the surface even if the dust feels light.
- Angle: Hold the nozzle at a 30 to 45 degree angle to the surface. Blowing straight down can trap dust against the paint. A shallow angle lifts and carries it away.
- Direction: Work from the top of the car downward. This prevents dust from falling onto areas you've already cleaned.
One more thing about compressed air. If you're using a shop compressor, install a moisture trap and an oil separator. Compressed air can contain water vapor and lubricating oil from the compressor pump. Spraying that onto your paint leaves residue that attracts more dust and can interfere with wax or sealant adhesion.
How to Actually Do It: Step-by-Step Workflow
Let's put it all together into a repeatable process. This assumes you've already confirmed your dust is light and non-abrasive.
Step 1: Park in the shade. Direct sunlight heats the paint and causes water spots if any moisture is present. It also makes it harder to see the dust. Shade gives you better visibility and more time to work.
Step 2: Check the humidity. If the relative humidity is below 30 percent, static buildup will be worse. Consider using an anti-static detailer spray after blowing, or skip blowing and use a waterless wash.
Step 3: Set up your blower. Attach the widest nozzle you have. Set the speed to the lowest setting that still moves dust. Test it on a small section of the rear bumper first.
Step 4: Start on the roof. Blow at a shallow angle, working from the center toward the edges. Move in overlapping passes. Don't rush.
Each pass should be slow enough to see the dust lift and clear.
Step 5: Move to the hood and trunk. Same technique. Shallow angle, overlapping passes, center to edges. Pay extra attention to the cowl area near the windshield.
Step 6: Do the sides last. The sides of the car collect most of the dust after you've blown the top surfaces. Work from the top of the doors downward. Angle the nozzle away from door gaps and window seals.
Step 7: Check your work. Walk around the car and look for remaining dust. If you see patches, hit them again with a quick pass. If there's residue that won't blow off, use a quick detailer spray and a clean microfiber towel.
Step 8: Apply an anti-static spray (optional). If you're in a dry climate or plan to park outside, a quick spritz of anti-static detailer helps repel dust for a day or two.
The whole process takes about 5 to 10 minutes for a standard sedan. That's faster than a waterless wash and much faster than a full bucket wash. But remember, this only works for light, non-abrasive dust.
Mistakes I See People Make All the Time
After looking through hundreds of verified buyer reviews and detailing forum discussions, a few mistakes come up repeatedly. These cause the most damage.
Mistake 1: Using full throttle. More airspeed is not better. High-speed air pushes dust particles across the paint instead of lifting them. It also creates more static electricity.
Start at the lowest effective speed and only increase if needed.
Mistake 2: Blowing too close. Getting the nozzle within a few inches of the paint seems efficient, but it's dangerous. The concentrated air pressure can force dust into the clear coat. It can also damage soft trim pieces and weather stripping.
Keep that 6 to 12 inch distance.
Mistake 3: Blowing into gaps. Door jambs, hood gaps, trunk seals, and window channels are dust magnets. When you blow directly into them, you push dust deeper where it's harder to remove. Over time, that dust can cause wear on seals and paint edges.
Mistake 4: Blowing abrasive dust. This is the big one. If the dust feels gritty or you're near a construction site, do not blow. Wash instead.
Mistake 5: Ignoring static buildup. In dry conditions, blowing dust can make the problem worse. The static charge pulls dust back onto the car within minutes. If you notice dust resettling quickly, switch methods or use an anti-static product.
Mistake 6: Using a dirty blower. If your leaf blower has been sitting in the garage, the intake and nozzle are probably dusty. Turn it on and let it run for a few seconds before pointing it at your car. Otherwise, you're blowing garage dust onto your paint.
Mistake 7: Skipping the follow-up. Blowing removes most of the dust, but rarely all of it. A quick pass with a detailer spray and a microfiber towel catches the remaining particles. Skipping this step leaves a thin layer that dulls the finish.
When Blowing Is the Wrong Move (and What to Do Instead)
Blowing fails in three scenarios. Abrasive dust. Settled heavy dust.
And any situation where static buildup makes the problem worse.
If you've confirmed blowing won't work, your alternatives are straightforward. For light to moderate dust, a waterless wash with a quality spray and microfiber towels works well. For heavy or abrasive dust, a full two-bucket wash is the only safe option.
For those with a pressure washer, a foam pre-soak followed by a gentle rinse is effective.
| Dust Type | Best Alternative | Why |
|---|---|---|
| Light, settled | Waterless wash | Lubrication lifts dust without scratching |
| Heavy, caked-on | Rinseless or full wash | Water flushes away particles |
| Abrasive (sand, silica, ash) | Full two-bucket wash | Maximum water volume removes grit |
| Static-prone (low humidity) | Anti-static detailer spray | Reduces reattachment |
Pro Tips for Ceramic Coatings, Wraps, and Classic Paint
Different paint surfaces need different approaches.
Ceramic coatings are the best candidate for blowing dust off your car. The hard, slick surface allows dust to lift easily with minimal airspeed. Static buildup is also lower on properly cured coatings.
However, the coating itself can be damaged by aggressive airflow or abrasive particles. Stick to low speeds and maintain that 6 to 12 inch nozzle distance.
Paint protection film (PPF) is more forgiving than bare clear coat. The soft urethane layer absorbs impacts and scratches. But PPF can be damaged by concentrated air pressure at close range.
The edges of the film are especially vulnerable. Keep the nozzle at least 12 inches away and avoid blowing directly at the film edges.
Matte paint and matte PPF require special care. Never blow dust off a matte finish. The textured surface traps particles in a way that clear coat does not.
Blowing pushes them deeper into the texture. A rinseless wash with a dedicated matte-safe product is the better choice.
Classic car paint is often single-stage with no clear coat. That paint is softer and more prone to scratching than modern clear coats. Blowing light dust works, but only at very low speeds.
When in doubt, use a waterless wash with a high-lubricity spray.
The Bottom Line: Should You Blow Dust Off Your Car?
Yes, but only under the right conditions. Blowing works for light, loose, non-abrasive dust on a healthy clear coat or ceramic coating. It's fast.
It's contact-free. And it preserves your wax or sealant.
For everything else, use water. A rinseless wash, a waterless wash, or a full two-bucket wash will protect your paint better than any amount of blowing ever could.
The decision always comes down to one question. What kind of dust are you dealing with? Answer that honestly, and you'll never have to guess again.