Flushing your outboard motor after a day on the water isn't optional if you want it to last past a few seasons. But the first time you stare at a pair of plastic ears and a garden hose, it's not obvious how to set up motor wash spray the right way without cooking your water pump.
Saltwater is aggressively corrosive. According to manufacturer service manuals, salt crystals start forming inside cooling passages within minutes of the engine shutting down. A proper flush with the right setup removes those deposits before they harden into scale that chokes off water flow.
Here's how to do it without learning the hard way.
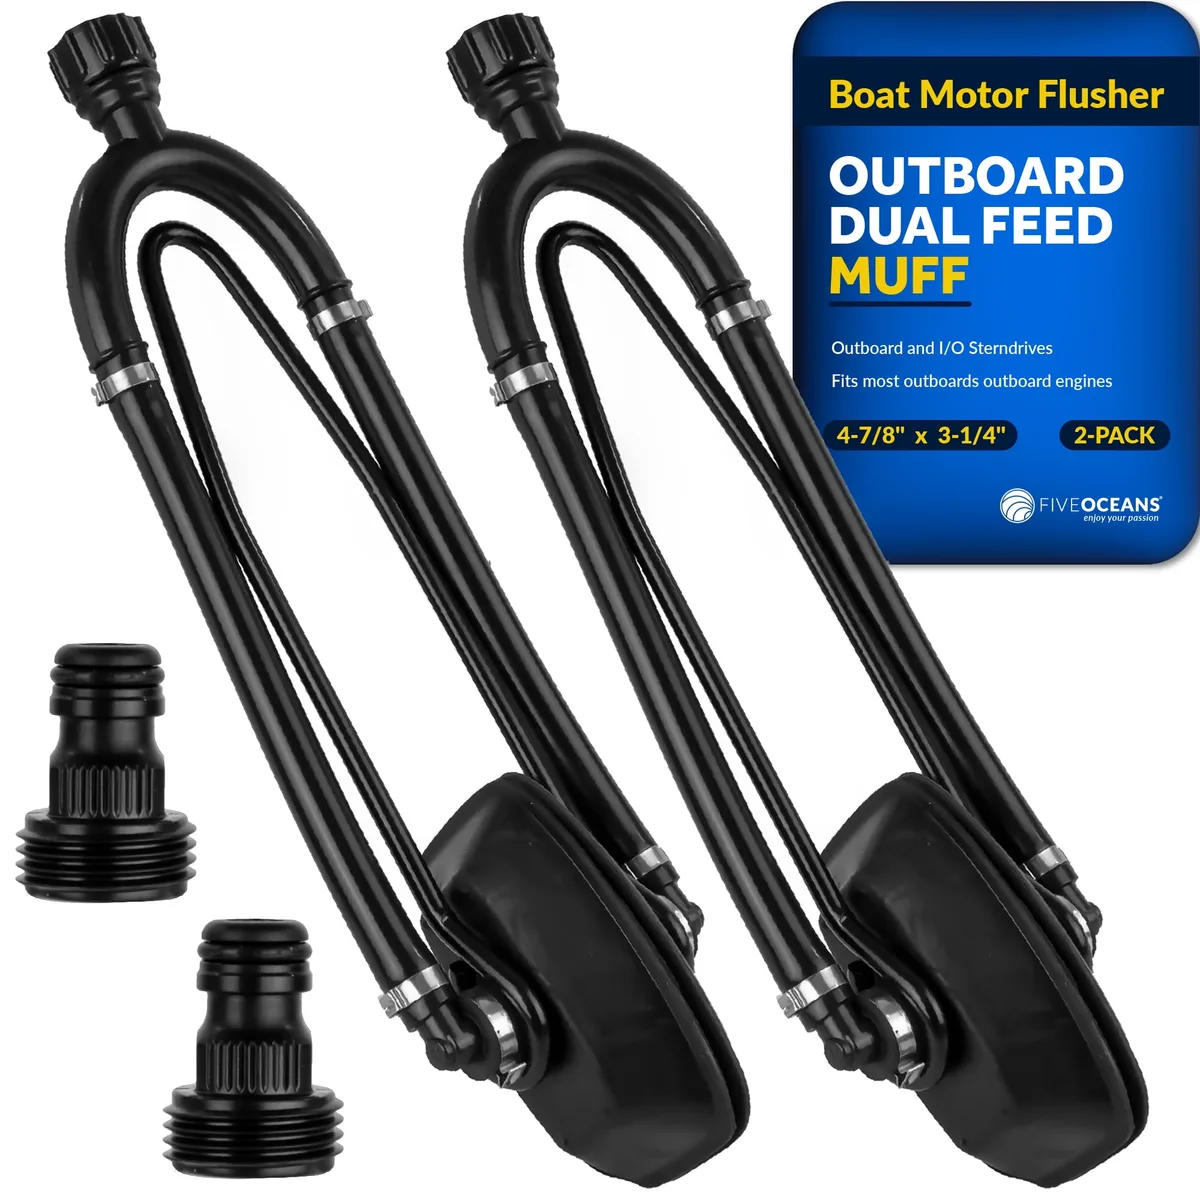
Image source: Bing (Web (fair-use with source credit))
Why Getting This Right Visually Matters
You cannot set up a motor wash spray by feel alone. The difference between a perfect seal and a slow leak is often a quarter-inch of rubber cup placement. If you've watched someone fumble with muffs while water sprays everywhere and the engine starts running hot, you already know this isn't the kind of job you wing.
What makes this task inherently visual is the intake geometry. Every outboard manufacturer shapes the water intake grates differently. Yamaha uses a wide rectangular opening.
Mercury favors a narrower oval. Suzuki and Honda each have their own variations. The muffs need to center perfectly over those openings, and you need to see the seal form before you ever turn the key.
This is also why so many boaters damage their impellers on the first try. They attach the muffs loosely, start the engine, and assume the water will find its way in. It won't.
Without a tight rubber seal around the intake grates, the water pump pulls air instead of water. That air pocket can destroy the impeller vanes in under thirty seconds.
The visual cues matter at every stage: how the muffs sit, how the water flows, and what the tell-tale stream looks like. If you learn to read those signs, you will never accidentally run your motor dry again.
What You Actually Need (and What to Skip)
You do not need a lot of gear, but you need the right gear. Here is exactly what goes into a proper motor wash setup:
The flush muffs. These are the rubber cups that clamp over the intake. They come in two main styles: single-cup and dual-cup. Single-cup muffs work for smaller outboards with one intake opening.
Dual-cup muffs cover both sides of the lower unit simultaneously. If you own a motor over 50 horsepower, get dual-cup muffs. They seal better and reduce the chance of the cups slipping off during the flush.
A standard garden hose. Nothing fancy. A 5/8-inch diameter hose delivers enough volume for most outboards up to 300 horsepower. Avoid using a pressure washer hose or a compressed air line.
The water pressure from a residential spigot is already in the ideal range of 20 to 60 PSI.
A water source with adequate pressure. City water works perfectly. If you are on a well system, make sure the pressure tank holds at least 40 PSI during the flush. Low pressure means low volume, and the impeller needs a certain flow rate to stay cool.
The motor itself. Obviously. But make sure it is trimmed down to a vertical position before you start. Running the motor tilted up can trap air in the cooling system.
Things you can skip. A pressure gauge is unnecessary unless you are troubleshooting a known problem. Brass quick-connect fittings are nice but not required. You also do not need a dedicated flush bag or bucket unless you are working on an inboard/outboard setup with a closed cooling system.
For a quick reference, here is what the basic gear looks like in terms of cost and compatibility:
| Item | Typical Price | What to Look For |
|---|---|---|
| Dual-cup flush muffs | $20 – $40 | Heavy-duty rubber, metal brackets, wide cups |
| Garden hose (50 ft) | $15 – $30 | 5/8-inch diameter, brass fittings |
| Hose shutoff valve | $5 – $10 | Ball valve type, inline |
| Quick-connect set | $10 – $20 | Brass or stainless, not plastic |
The good news is that most of this gear works across multiple motors and even has crossover use for your car wash setup. A quality water spray gun for car wash uses the same hose connections, so you can double up on gear without buying twice.
Step-by-Step Setup (What to Look For at Each Stage)
Setting up a motor wash spray is a five-phase process. Each phase has a specific visual check that tells you whether you are on track or about to make a costly mistake.
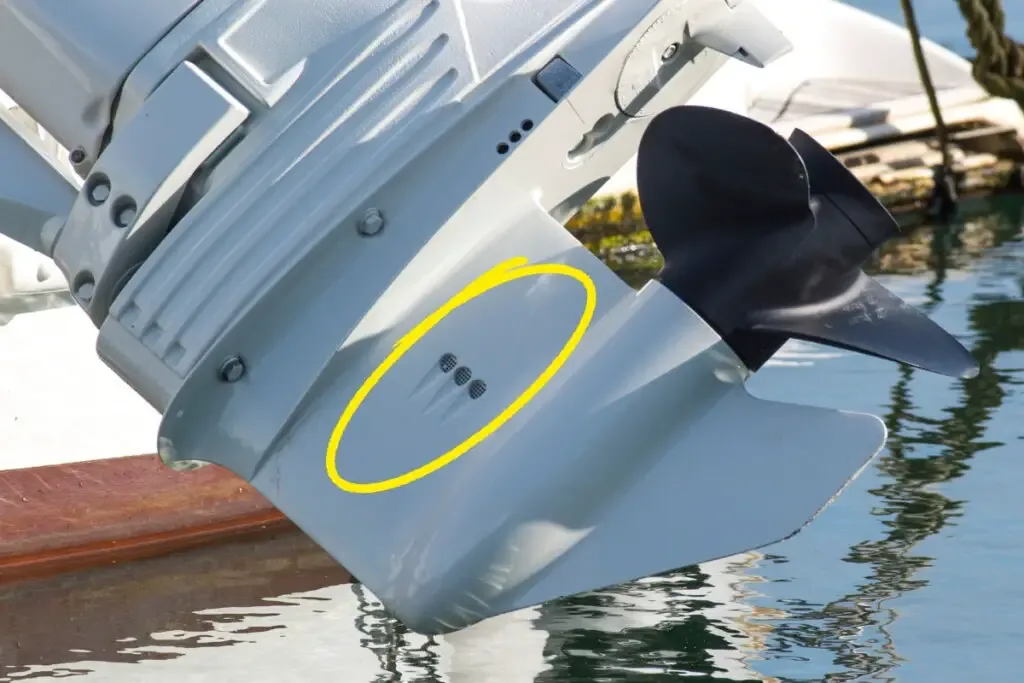
Image source: Bing (Web (fair-use with source credit))
Phase 1: Prepare the Boat and Motor
Park the boat on level ground. If it is on a trailer, chock the wheels. Lower the outboard to its full vertical position.
You do not want the motor tilted up because the water intake grates need to be fully submerged in water flow, and the water pump needs to be fully immersed during operation.
Remove the engine cowling if your model requires it for access. Some outboards have intake grates on both sides that need to be visible for proper muff placement.
Phase 2: Attach the Muffs Correctly
This is where most people get it wrong. You need to center the rubber cups over the intake grates, not just slap them on and hope. Squeeze the handles together so the cups open wide, then slide them over the lower unit until the rubber seats against the housing.
The cups should cover the intake openings completely with no gaps.
Release the handles slowly. The spring tension holds the muffs in place, but gravity and water pressure do the real work. Tug gently on the muffs to confirm they are locked in place.
If they slide or rotate, reposition them.
Phase 3: Water On, Then Engine On
Turn the water on slowly. Do not blast it at full pressure right away. Let the water flow until you see it streaming out from around the muffs and from the exhaust relief port.
This confirms water has filled the cooling passages before the engine starts.
Start the engine. Keep it in neutral with the throttle at idle. Most manufacturers recommend running the motor at 900 to 1200 RPM during a flush.
This is fast enough to circulate water through the system but slow enough to avoid damaging the water pump.
Phase 4: Monitor the Tell-Tale and Temperature
The tell-tale is the small water stream that exits the back of the motor. It is your primary indicator that the flush is working. Look for a steady, consistent stream.
If the stream sputters, pulses, or stops entirely, shut the engine down immediately and check the muffs.
Phase 5: Shut Down in the Right Order
Let the engine run for five to ten minutes. When you are done, shut the engine off first. Let the water run for another thirty seconds to cool the exhaust passages, then turn off the water.
Remove the muffs and tilt the motor down briefly to drain any residual water.
Visual Signs of a Good vs. Bad Setup
You can tell within the first ten seconds whether your motor wash setup is working correctly. Here is what to look for:
A good setup shows:
- The muffs sit flush against the lower unit with no gaps
- Water flows steadily from the tell-tale within five seconds of starting the engine
- The water stream is clear, consistent, and has a solid pencil-thin diameter
- No water sprays from around the muffs under pressure
A bad setup shows:
- Water sprays sideways from under the rubber cups
- The tell-tale stream sputters or trickles
- The engine temperature gauge climbs above the normal operating range
- Steam or smoke appears from the motor housing
If you see any of the bad signs, shut the engine down immediately and check the muff alignment. Do not try to adjust the muffs while the engine is running. That is how impellers get damaged.
What the Tell-Tale Actually Tells You
The tell-tale is not just a decoration. It is your only real-time indicator that water is moving through the engine. The stream should be continuous and strong enough to hit the water or ground at least six inches from the motor.
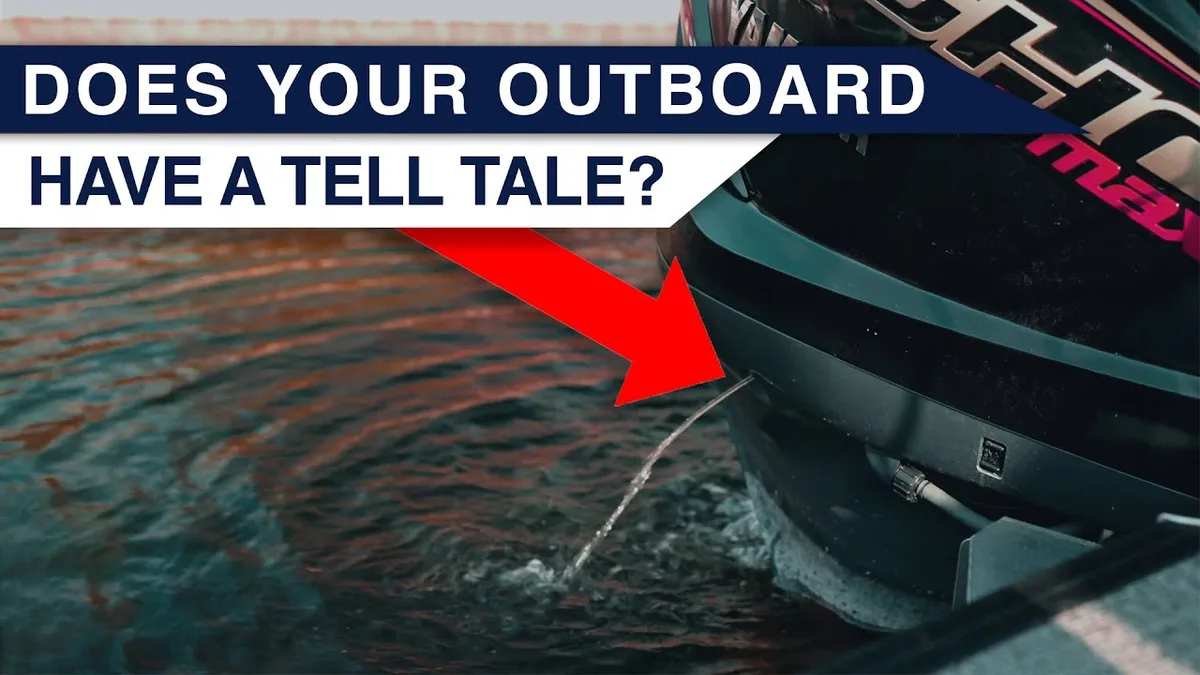
Image source: Bing (Web (fair-use with source credit))
A weak stream usually means one of three things: the muffs are not sealed properly, the water pressure is too low, or there is a blockage in the cooling passages. A pulsing stream suggests air is getting into the system, which points back to a bad muff seal.
If the tell-tale stops completely, you have already lost water flow. Shut the engine off immediately, even if the temperature gauge has not climbed yet. The impeller can fail in under a minute of dry operation.
Some newer outboards have a secondary tell-tale or an electronic flow sensor. If your motor has one, it provides an additional safety layer, but do not rely on it alone. The visual stream is still your most reliable indicator.
7 Mistakes You Can See Coming (and How to Stop Them)
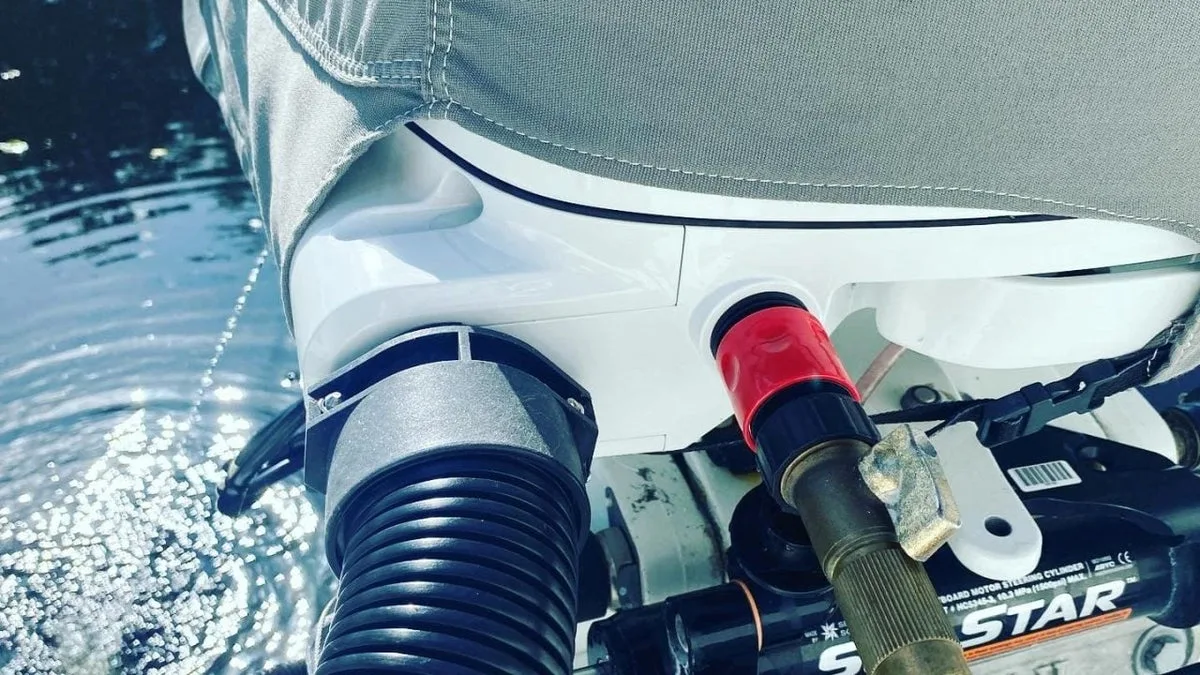
Image source: Bing (Web (fair-use with source credit))
Most motor wash failures happen because of small, avoidable errors. Here are the seven most common mistakes, ranked by how often they show up in user reports:
1. Running without enough water volume. A garden hose at low pressure delivers about five gallons per minute. That is enough for most outboards, but if you are running a motor over 250 horsepower, you may need to upgrade to a larger hose or a dedicated flush system.
2. Using the wrong size muff cups. Universal muffs work for many motors, but they do not work for all. Factory service manuals specify the exact muff size for each model.
When in doubt, look up your motor and buy the OEM-recommended muffs.
3. Starting the engine before turning on the water. This is the fastest way to destroy an impeller. Always turn the water on first and confirm flow before starting the engine.
The impeller needs water to lubricate the rubber vanes.
4. Running the engine at full throttle. A motor flush is not a test run. Idle only.
High RPM generates heat faster than the water flow can remove it.
5. Forgetting to remove the muffs before launching. The muffs will not float. If you leave them attached and put the boat in the water, they can jam against the lower unit or get sucked into the impeller.
6. Skipping the final drain. Water trapped in the cooling passages can freeze in cold weather and crack the block. Even in warm climates, standing water encourages corrosion.
Tilt the motor down after the flush and let everything drain.
7. Using a pressure washer instead of a garden hose. Pressure washers deliver water at 1500 PSI or more. That will blow past rubber seals and force water into bearings and electrical connections.
Stick to a standard hose.
A solid motor wash setup takes ten minutes from start to finish. If you have ever cleaned your car using the right hose car wash sprayer, you already understand the importance of proper water flow and pressure control. The same principles apply here, just with a lot more at stake if you get it wrong.
When to Check Your Manual (and What to Look For)
Every outboard motor manufacturer publishes a specific flush procedure. The general steps above cover the most common setups, but your particular motor may have quirks.
For example, some Yamaha outboards require the engine to be running at a specific RPM range during the flush, while certain Mercury models recommend running the motor at idle only. Suzuki motors with the factory flush port need the hose connected to a fitting on the side of the cowling rather than to muffs.
Look up the owner's manual online if you do not have a paper copy. Most manufacturers post PDF versions on their websites. The manual will tell you:
- The exact RPM range for flushing
- Whether to use muffs or a factory flush port
- How long to run the motor
- Any special warnings about your specific model
If you cannot find the manual, call the dealer and ask. A two-minute phone call is cheaper than replacing a water pump assembly.
How a Pro Spots Trouble in Under a Minute
Experienced marine technicians check three things within the first sixty seconds of a flush. First, they look at the muff seal. A good seal leaves no visible gaps between the rubber and the lower unit.
Second, they check the tell-tale stream for consistency. Third, they listen for any knocking or grinding sounds from the lower unit, which could indicate a failing impeller bearing.
If the tell-tale stream is weak but the muff seal looks good, the technician will check the water pressure at the hose connection. Many homes have reduced water pressure if another fixture is running inside the house. Shutting off the kitchen sink or washing machine can restore full pressure to the hose.
If the stream is strong but the engine still runs hot, the problem is not the setup. It is a blockage in the cooling system, and that requires removing the thermostat or backflushing the passages with a specialized tool.
FAQs from First-Timers
How long do I actually run the flush?
Five to ten minutes is the standard recommendation. If you are flushing after saltwater use, lean toward ten minutes. If you are just running fresh water through after a freshwater trip, five minutes is usually enough.
Can I use a pressure washer instead?
No. Pressure washers damage the water pump seals and can force water into areas it should not go. Stick to a garden hose.
The right water spray gun for car wash works well for rinsing the exterior of the motor, but never connect a pressure washer to the flush system.
What if the muffs won't stay on?
This usually means the cups are the wrong size for your motor. Check the manufacturer's recommendations. Some motors need a specific model of flushing muffs designed for their intake geometry.
If the muffs keep slipping, try using a bungee cord to hold them in place, but only as a temporary measure until you get the right size.
Do I need to run the engine at idle or higher?
Idle, plus a small bump in RPM. Most outboards need to be running at 900 to 1200 RPM to open the thermostat and allow full water circulation. Running at a dead idle may not generate enough heat to open the thermostat, which means some passages stay dry.
Final Quick-Start Checklist
- Lower the motor to vertical position
- Check the water intake grates for debris
- Center the muffs over the intake openings
- Confirm the rubber cups seal with no gaps
- Turn the water on slowly
- Wait for water to flow from the exhaust relief port
- Start the engine at idle
- Verify the tell-tale stream is steady and strong
- Run for five to ten minutes
- Shut the engine off first
- Let the water run for thirty seconds more
- Turn water off and remove muffs
- Tilt motor down to drain
That is the complete process. If your setup ever feels wrong mid-flush, trust your instincts and shut it down. A ten-second check is always worth more than a new water pump.