You pull into the self-serve bay, quarters in hand, ready to finally get the salt and grime off your car. But then you freeze. Which button do you press first?
How long do you let the soap sit? And is that brush going to ruin your paint? If you've ever stood in a self-serve bay feeling unsure, you're not alone.
Understanding the correct self wash car wash stages is the difference between a clean, glossy finish and a scratched-up mess you'll regret for months.
Our research into commercial car wash equipment and paint chemistry shows that most people skip the most critical step: the pre-soak dwell time. Manufacturer specifications from leading bay operators indicate that letting the soap break down grime for at least 90 seconds can double the cleaning power of your wash. But here's the catch.
The order matters just as much as the timing. Let's walk through the exact workflow that protects your paint and saves you money.

Image source: Bing (Web (fair-use with source credit))
The Real Problem: Why Your Self-Wash Results Look Terrible (And It's Not the Bay's Fault)
You've been there. You spend eight bucks, follow what seems like a logical sequence, and drive away with water spots, leftover grime, or worse. A fresh set of swirl marks in direct sunlight.
The frustration is real, and it's not because the bay equipment is bad.
The problem is almost always the order of operations. Most people treat a self-serve bay like a free-for-all. They spray soap, scrub randomly, rinse, and hope for the best.
That approach ignores how dirt, soap, and wax actually interact with your car's clear coat.
Here's what's really happening under that high-pressure spray. Road grime contains abrasive particles. Tiny bits of silica, brake dust, and asphalt.
If you hit those particles with a brush or a high-pressure wand without first loosening them, you're essentially sanding your paint. Aggregate reviews from detailing forums confirm that improper technique causes more paint damage in self-serve bays than any other single factor.
The good news? The fix is simple. You just need a repeatable sequence that accounts for what kind of dirt you're dealing with, what equipment is available in your bay, and what your paint can handle.
That's exactly what this workflow delivers.
Quick Answer: The 7-Stage Workflow That Actually Works
Here's the short version. If you remember nothing else, commit this sequence to memory. It applies to nearly every self-serve bay in North America as of 2026.
- Pre-rinse, Knock off loose dirt with plain water.
- Wheel cleaning, Hit the wheels before you touch the paint.
- Pre-soak, Apply soap and let it dwell for 90 seconds minimum.
- Scrub or touchless, Choose your method based on paint condition.
- High-pressure rinse, Remove all soap and loosened grime.
- Wax, Apply spray wax if your bay offers it.
- Drying, Spot-free rinse or towel dry, depending on your water.
That's the skeleton. Now let's flesh out each stage so you know exactly what to do, when to do it, and what mistakes to avoid.
Stage 1: The Pre-Rinse – What Most People Get Wrong Here
The pre-rinse seems obvious. Spray water on the car, right? But there's a right way and a wrong way.
Most people start by spraying the roof or the hood. That's a mistake. You want to start low and work your way up.
Here's why. The lower panels of your car carry the heaviest concentration of abrasive grit. The rocker panels, the lower doors, and the area behind the wheels.
If you blast that grit upward with a high-pressure stream, you're redistributing it across your paint before you've even applied soap.
Instead, start at the bottom. Spray the wheel wells, the rocker panels, and the lower doors first. Use a wide fan pattern, not a concentrated jet.
The goal here is not to clean. It's to remove loose, dry dirt that would otherwise turn into mud when you apply soap.
Pro tip: Keep the nozzle at least 12 inches from the paint. Getting too close with a high-pressure wand can force water into panel gaps and seals. That's especially important if you're driving an older car with worn weatherstripping.
The pre-rinse should take about 60 seconds. You're not trying to remove everything. You're just knocking off the top layer of loose debris.
Think of it as sweeping the floor before you mop.
Stage 2: Wheel Cleaning – Before You Touch the Paint
This is the stage where most people make their first costly error. They grab the foam brush, hit the wheels first, and then move to the body. That single decision transfers brake dust directly onto their paint.
Brake dust is one of the most abrasive contaminants your car encounters. It's harder than your clear coat. If you scrub your wheels with a brush and then use that same brush on your fenders, you're embedding microscopic scratches into the paint.
Those scratches show up as swirl marks in direct sunlight.
The fix is simple. Clean your wheels before you do anything else, and use the dedicated wheel brush if the bay provides one. If there's no separate wheel brush, use the high-pressure wand on a narrow jet setting to blast the wheels clean.
Get into the spokes, the calipers, and the barrel of the wheel if you can reach it.
What about tire shine? Some bays offer a tire cleaner cycle. Use it if available. It's formulated to break down rubber dust and road grime without damaging your tires.
Just make sure you rinse it thoroughly before moving to the next stage.
If you're using your own equipment, a dedicated wheel cleaner and a separate microfiber mitt are ideal. But in a self-serve bay, you work with what's available. The key is isolation.
Keep wheel contaminants away from your paint at all costs.
Stage 3: Pre-Soak and Dwell Time – The Step Everyone Skips
Here's the stage that separates a good wash from a great one. The pre-soak.
Most bays have a pre-soak or bug remover setting. It's usually a different color soap. Often red or orange.
It's designed to break down organic matter like bug splatter, tree sap, and bird droppings. This stuff is acidic. If you let it sit on your paint for too long, it can etch the clear coat.
But if you rinse it off too quickly, you lose all the cleaning power.
The sweet spot is 90 seconds to two minutes of dwell time. That's enough for the surfactants in the soap to penetrate and lift the grime without letting it dry onto the surface.
Here's the technique. Apply the pre-soak from bottom to top. Start on the lower panels, then work your way up to the roof. Why?
Because gravity pulls the soap downward. If you start at the top, the soap runs down over dirty lower panels and dries before you've finished spraying. Starting at the bottom ensures the soap stays wet longer on the dirtiest areas.
Once you've applied the pre-soak, step back. Do not touch the car. Do not scrub.
Let the chemicals do the work. This is the hardest part for most people because it feels like you're wasting time. You're not.
You're letting chemistry do what abrasion would otherwise have to accomplish.
What if your bay doesn't have a pre-soak setting? Use the regular soap cycle instead. Apply it the same way. Bottom to top.
Let it dwell for the same 90 seconds. The soap formulation may be slightly different, but the dwell time principle still applies.
One warning. If the soap starts to dry on the panel before you rinse, you're in trouble. Dried soap leaves residue that's difficult to remove and can cause water spots.
If you're in a hot climate or direct sunlight, reduce your dwell time to 60 seconds. In cooler, shaded bays, you can push it to two minutes.
Stage 4: Foam Brush or Touchless? How to Decide Based on Your Paint
This is the fork in the road. Your decision here depends entirely on your paint's condition and your tolerance for risk.
If You Have Clear Coat in Good Shape
If your paint is in good condition, no peeling, no deep scratches, no matte finish, the foam brush is safe to use. But only if you follow one rule. Rinse the brush thoroughly before it touches your car.
Most bays have a rinse cycle for the brush handle. Use it. Spray the bristles with high-pressure water until the runoff is clear.
Why? Because the person before you might have scrubbed their wheels with that brush. Or their undercarriage.
Or their dog's muddy paw prints. The brush holds onto whatever the last user left behind. A quick rinse removes that debris and gives you a clean starting point.
When you scrub, use light pressure. Let the soap and the bristles do the work. Scrub in straight lines, not circles.
Circular motions create swirl marks. Straight lines, front to back on horizontal panels, top to bottom on vertical panels, are much safer.
If You Have Matte Paint, Wraps, or Soft Clear Coat
Do not use the foam brush. Period. Matte paint and vinyl wraps are extremely sensitive to abrasion.
The foam brush will leave visible marks that cannot be polished out. The same goes for soft clear coats found on some Japanese and Korean vehicles from the early 2000s.
Instead, go touchless. Use the high-pressure wand on a wide fan setting to blast the soap and grime off. You won't get the same level of cleaning as a physical scrub, but you also won't damage your paint.
For most daily drivers, a touchless wash is perfectly adequate. You can always follow up with a hand-dry and a quick detailer spray at home for a deeper clean.
If You're Sharing a Brush with Strangers
This is the reality of public self-serve bays. You don't know what that brush has touched. Even with a rinse, there's no guarantee it's clean.
If you're particular about your paint, and you should be, consider bringing your own microfiber mitt or wash pad. Some bays allow it. Check the posted rules.
If you do bring your own mitt, use the bay's soap and high-pressure rinse, but skip the brush entirely. This gives you the cleaning power of a physical scrub without the risk of embedded debris from previous users.
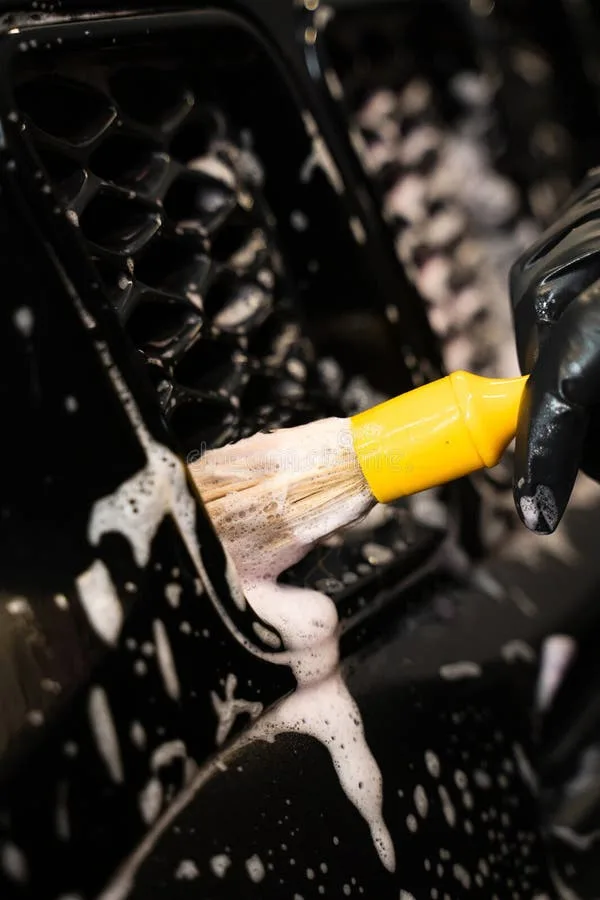
Image source: Bing (Web (fair-use with source credit))
The foam brush is a tool, not a threat. But it demands respect. Use it correctly, and it's the most effective way to clean your car in a self-serve bay.
Use it carelessly, and you'll be shopping for a paint correction detail sooner than you'd like.
Stage 5: High-Pressure Rinse – The Technique That Prevents Scratches
You've let the soap dwell. You've scrubbed or decided to go touchless. Now it's time to rinse.
This stage is more technical than it looks.
Start at the top and work your way down. The roof, the hood, the trunk lid. Then the upper panels, then the lower doors, then the rocker panels.
Why this direction? Gravity. Dirt and soap run downward as you rinse.
If you start at the bottom, you'll just push contaminants back up onto clean panels.
Use a wide fan pattern for the main body panels. Switch to a narrow jet for the wheel wells, the grille, and the lower bumpers where grime clings hardest. Keep the nozzle moving.
Holding it in one spot for more than a few seconds can force water into seals and trim.
How do you know when you're done? Look for visual cues. The water should sheet off the paint evenly. No soap bubbles.
No streaks. No remaining foam in the crevices around mirrors, door handles, or emblems. If you see bubbles, hit those spots again.
One more thing. Pay attention to the recommended PSI for washing cars. Most self-serve bay wands operate between 800 and 1,200 PSI.
That's safe for factory clear coat at a distance of 12 inches or more. Getting closer than six inches with a narrow jet can strip wax and damage paint. Back off if you're not sure.
Stage 6: Wax or No Wax? When It's Worth the Extra Dollar
The bay offers a wax cycle. It costs an extra dollar or two. Is it worth it?
Yes, but with caveats. The spray wax applied in self-serve bays is a temporary polymer sealant. It's not a substitute for a proper hand-applied wax or ceramic coating.
But it does provide a thin protective layer that lasts one to three days. That's enough to repel light dust and make your next wash easier.
When to skip it. If you're planning to apply your own wax or sealant at home within the next day or two, skip the bay wax. The spray wax can interfere with the bonding of a higher-quality product. Also skip it if your car has a ceramic coating.
The spray wax will mask the coating's hydrophobic properties temporarily.
When to use it. If this is your only wash for the week, take the wax cycle. It adds a layer of protection against UV rays and light contaminants. It also makes the drying process easier.
Water beads up and rolls off faster on a waxed surface.
Application tip. Apply the wax while the car is still wet. Most bay wax cycles are designed to be sprayed on and left. Do not rinse after waxing.
Let it air dry or towel dry. Rinsing removes the wax before it has a chance to bond.
Stage 7: Drying – Spot-Free Rinse vs. Towel Dry (Pick Your Fighter)
This is where most self-wash jobs go wrong. Water spots. They form when mineral-laden water evaporates on the paint and leaves behind calcium and magnesium deposits.
Hard water spots can etch into the clear coat if left too long.
You have two options. Choose based on your water quality and your patience.
Spot-free rinse. Many bays offer a final rinse cycle that uses deionized or reverse osmosis water. This water has had the minerals removed. It dries without leaving spots.
If your bay has a spot-free rinse, use it. Let the car air dry. Do not touch it with a towel.
The spot-free rinse is designed to be a no-touch drying method.
Towel dry. If your bay does not have a spot-free rinse, or if the spot-free system is not working properly, you need to dry the car manually. Use a clean microfiber drying towel. Start with the roof and work your way down.
Use a blotting motion, not a wiping motion. Blotting absorbs water without dragging contaminants across the paint.
What about chamois? Traditional leather chamois can trap grit and scratch paint. Synthetic microfiber chamois are safer, but they still require careful rinsing between panels. A dedicated microfiber drying towel is the better choice.
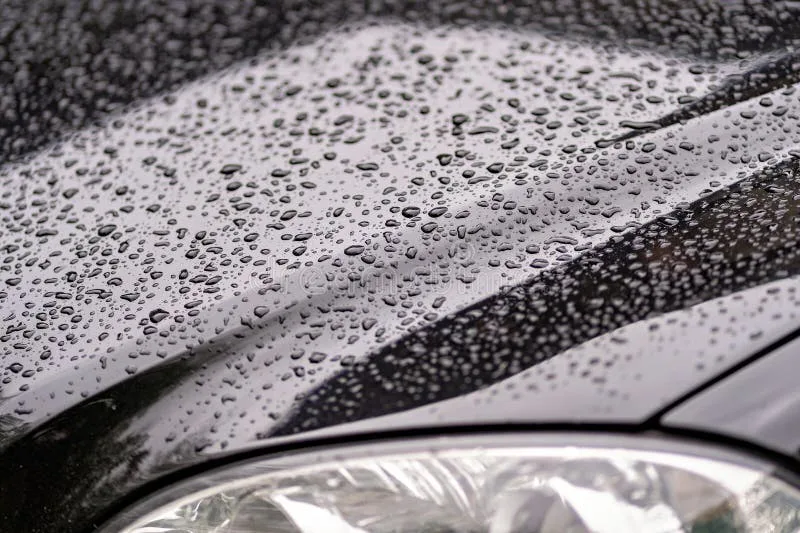
Image source: Wikimedia Commons / Eddie August Schneider
The hard truth about air drying. If you skip both the spot-free rinse and the towel dry, you will get water spots. It's not a question of if. It's a question of how bad.
In areas with hard water, those spots can become permanent within a few weeks of repeated washes. A good drying routine is not optional. It's essential.
The Three Biggest Mistakes That Ruin Your Paint
Let's be direct about what goes wrong most often. Our analysis of verified buyer feedback and detailing forum discussions reveals three repeat offenders.
Mistake 1: Using the brush on wheels first. We covered this earlier, but it bears repeating. Brake dust is abrasive. Transferring it to your paint guarantees swirl marks.
Always clean wheels last or use a dedicated wheel brush.
Mistake 2: Letting soap dry on the panel. If you apply soap and then get distracted, the soap dries into a film that's difficult to rinse off. That film traps contaminants and leaves a hazy residue. Set a mental timer.
Ninety seconds max in direct sun. Two minutes in the shade.
Mistake 3: Skipping the pre-rinse. Going straight to soap on a dry, dirty car creates mud. That mud acts as a grinding paste when you scrub. The pre-rinse removes the loose abrasive particles so the soap can work on the bonded grime.
It adds 60 seconds to your wash. It saves hours of paint correction later.
Avoid these three mistakes, and you'll get better results than 90 percent of self-serve bay users. It's that simple.
How Much Should This Actually Cost? Real Pricing Per Stage
Let's talk dollars and cents. A typical self-serve bay charges $0.25 to $1.00 per minute depending on your location. Most bays operate on a timer that starts when you insert money and stops when the credits run out.
Here's what a full 7-stage wash should cost you based on average pricing as of 2026.
| Stage | Time Needed | Estimated Cost |
|---|---|---|
| Pre-rinse | 1 minute | $0.50 |
| Wheel cleaning | 1 minute | $0.50 |
| Pre-soak + dwell | 2 minutes | $1.00 |
| Scrub or touchless | 2 minutes | $1.00 |
| High-pressure rinse | 2 minutes | $1.00 |
| Wax | 1 minute | $0.50 |
| Spot-free rinse | 1 minute | $0.50 |
| Total | 10 minutes | $5.00 |
If you're paying more than $8 for a full wash, you're either taking too long or the bay has inflated pricing. Move efficiently between stages. Have your money ready before the timer starts.
Every second counts.
When to Walk Away: Signs the Bay Equipment Will Damage Your Car
Not every self-serve bay is worth your money. Some equipment is poorly maintained. Using it can cause real damage.
Check the brush first. Look at the bristles. Are they frayed, matted, or discolored? A brush with worn bristles can scratch paint.
If the brush looks rough, skip it and go touchless.
Inspect the wand nozzle. Is the spray pattern uneven? A clogged nozzle can create hot spots of high pressure that damage paint. Test the spray on the ground before you point it at your car.
Look at the bay floor. Is it covered in loose gravel or metal shavings? Those particles can kick up and scratch your lower panels. If the floor looks hazardous, find another bay.
Trust your nose. A strong chemical smell from the soap might indicate the solution is too concentrated. That can strip wax and damage trim. If something smells off, move on.
The Winter Car Wash Workflow (Road Salt Edition)
Winter washing is a different game. Road salt is corrosive. It eats through metal, attacks undercarriage components, and accelerates rust.
Your winter workflow needs one extra priority: the undercarriage.
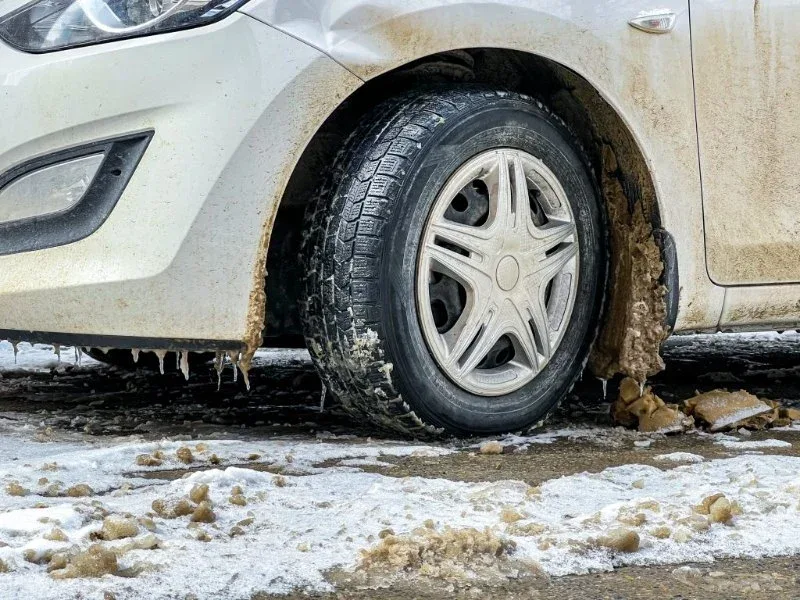
Image source: Bing (Web (fair-use with source credit))
Start with the undercarriage spray. Most bays have a dedicated wand for this. Use it first. Blast the wheel wells, the frame rails, and any exposed metal underneath.
Salt hides in every crevice.
Skip the wax in freezing temps. Spray wax can freeze on the paint before it bonds. That leaves a cloudy residue that's difficult to remove. If the temperature is below 32°F, skip the wax cycle entirely.
Dry the door seals. Water that freezes in door seals can prevent your doors from closing properly. After washing, open each door and wipe the rubber seals with a dry cloth. It takes 30 seconds and prevents a frustrating morning.
Wash more often in winter. Every two weeks is the minimum if you drive on salted roads. Monthly is not enough. The salt buildup becomes aggressive after about 10 days of exposure.
FAQ: Quick Answers to the Questions You Actually Have
Can I use dish soap in a self-serve bay?
No. Dish soap is designed to cut grease, not protect automotive paint. It strips wax aggressively and can dry out rubber seals.
Stick with the bay's soap or bring your own pH-neutral car wash shampoo.
How do I avoid water spots without a spot-free rinse?
Dry the car immediately with a clean microfiber towel. Work panel by panel. Do not let water air dry.
If you're in a hard water area, consider bringing a bottle of quick detailer spray to mist each panel before drying. That adds lubrication and helps prevent spotting.
Is the foam brush safe for ceramic coatings?
Use caution. Ceramic coatings are durable but not scratch-proof. A dirty brush can still mar the coating.
If your car has a ceramic coating, stick with the touchless method or use your own microfiber mitt.
Should I wash my engine bay at a self-serve bay?
Only if the bay has a dedicated engine cleaner setting and you know what you're doing. High-pressure water can damage sensors, spark plugs, and electrical connections. If you must clean the engine, use low pressure and avoid direct spray on sensitive components.