Is there a special way to wash the engine or under the hood of a BYD Sealion 6? The short answer is yes, absolutely. This isn't your grandfather's V8 under there, and treating it like a conventional engine bay is a fast track to expensive problems.
The Sealion 6 is a plug-in hybrid, which means it packs high-voltage components alongside a traditional 1.5-liter engine. Per IP67 rating standards, the main battery pack is sealed against dust and temporary submersion, but the rest of the bay is not. One wrong spray from a pressure washer can send water into connectors that carry 300-plus volts, triggering warning lights, corrosion, or worse.
Let's walk through exactly what makes this different and how to do it safely.
Why This Matters More Than You Think
A conventional car's engine bay is relatively forgiving. Water gets into a connector, it dries out, life goes on. A hybrid like the Sealion 6 has orange-cabled high-voltage wiring running through the bay.
Those cables carry enough current to cause serious injury if the insulation is compromised, and they connect to sensitive electronics that don't appreciate moisture.
The stakes are higher for another reason too. The Sealion 6's warranty is tied to proper maintenance. If a dealership finds water damage in a high-voltage connector or control module, they can deny a warranty claim.
Aggregate reviews from hybrid owners report that water-related electrical issues are one of the most common reasons for denied claims on newer hybrid vehicles.
So when we talk about washing this engine bay, we're not just talking about cosmetics. We're talking about protecting a multi-thousand-dollar investment. With the right approach, you can absolutely clean it safely.
You just need to know where the danger zones are and how to work around them.
The Real Risk: What Happens When Water Meets High Voltage
The Sealion 6's engine bay contains several components that are not designed to get wet. The most vulnerable are the high-voltage connectors, the DC-DC converter, the inverter, and the engine control unit. These parts have seals, but those seals are designed for splash resistance, not a direct blast from a pressure washer.
Water intrusion in a high-voltage connector creates a path for current to leak. That causes corrosion inside the connector, which increases resistance and generates heat. Over time, that heat can melt the connector housing or damage the pins.
In worst-case scenarios, it can create a short circuit that trips the vehicle's safety systems, leaving you stranded.
The low-voltage electronics are just as vulnerable. The ECU and BMS sit in the engine bay on many hybrids, and they're protected by plastic housings with vent holes. Those vent holes let pressure equalize, but they also let water in if you spray directly at them.
Once moisture gets inside a control module, it can cause intermittent faults that are a nightmare to diagnose.
There's also the cosmetic damage. Many Sealion 6 owners report that the plastic engine cover and sound-deadening material trap moisture. If you don't dry everything thoroughly, you end up with musty smells, white corrosion on aluminum parts, and degraded rubber hoses.
None of that is covered under warranty.
What's Actually Under the Hood of a Sealion 6 (And What You Can't Touch)
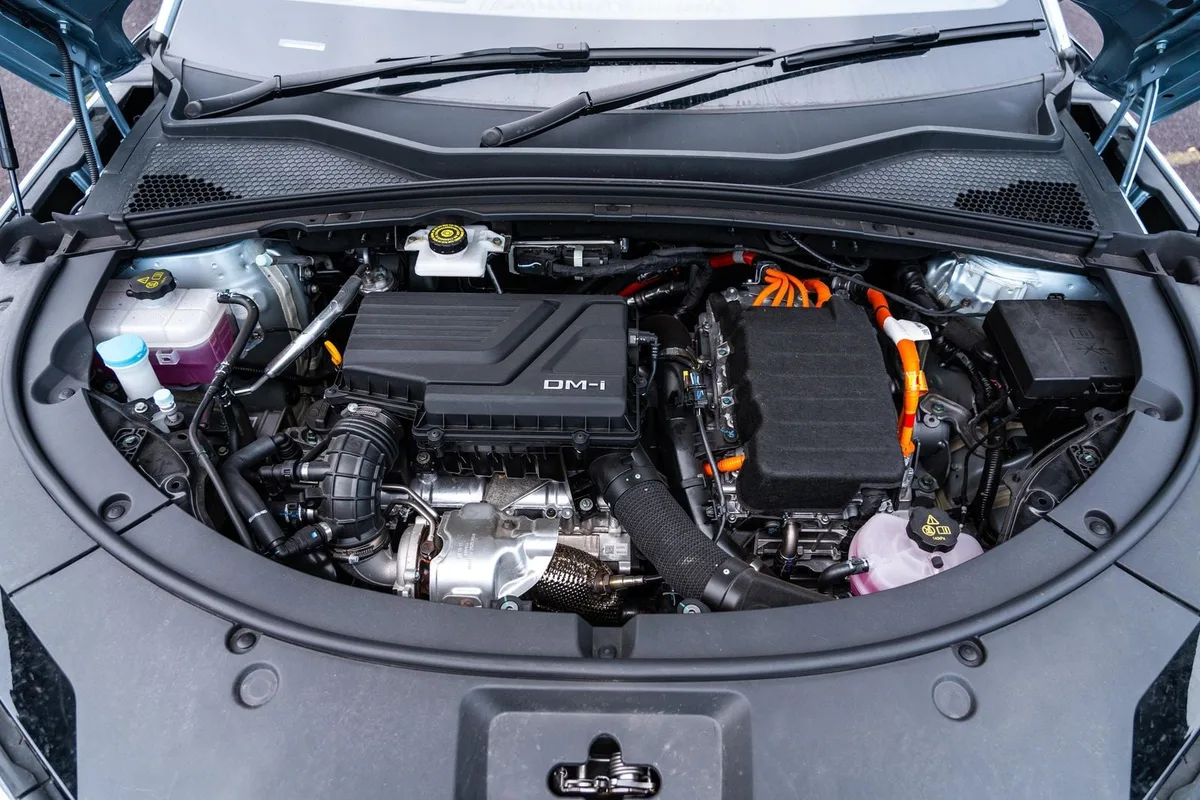
Image source: Bing (Web (fair-use with source credit))
Before you think about water, you need to know what you're looking at. Pop the hood on a Sealion 6 and you'll see a plastic engine cover dominating the center. Under that is the 1.5-liter gasoline engine.
But the real action is in the details.
Here's what's in there and what you need to treat carefully:
- High-voltage cables, Bright orange, running from the inverter to the electric motor and battery. Never spray these directly.
- Inverter/DC-DC converter, Usually mounted near the firewall. Converts high-voltage DC to low-voltage for the 12V system. Extremely sensitive to moisture.
- Engine control unit (ECU), The brain of the engine. Usually in a plastic box. Has vent holes.
- Battery management system (BMS), Monitors the hybrid battery. Often integrated into the battery pack or mounted nearby.
- Fuse box, Contains relays and fuses for both high and low voltage systems. Not sealed.
- Air intake, The opening where the engine breathes. Water here means hydrolock.
- Alternator, On hybrids, this is often a motor-generator unit. Expensive and water-sensitive.
- 12V battery, Usually in the trunk on the Sealion 6, but check your model. Some variants have it under the hood.
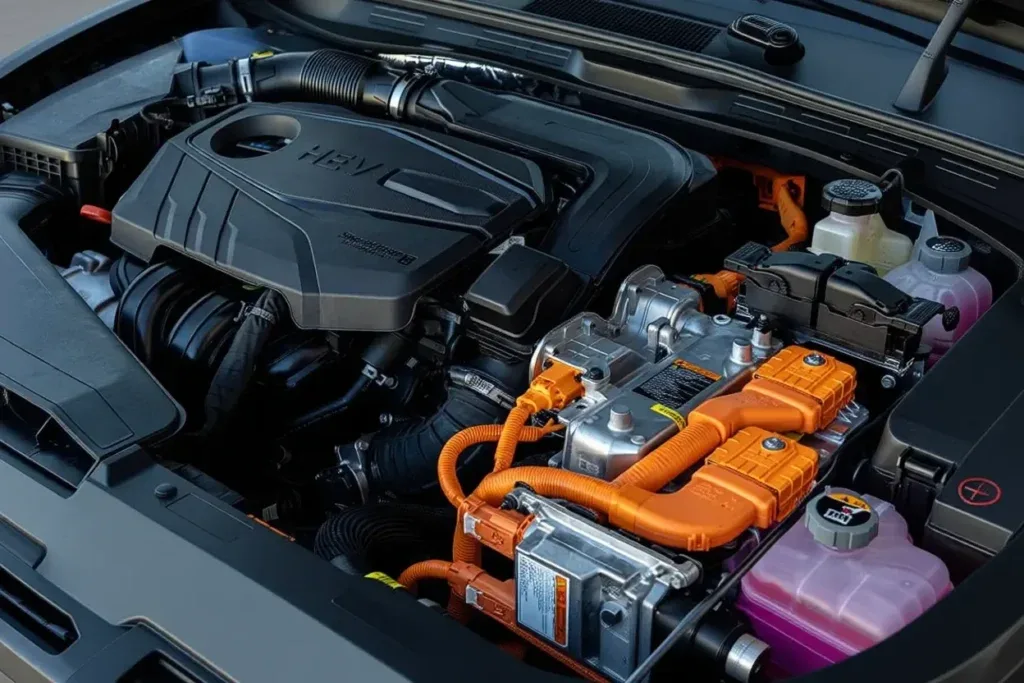
Image source: Bing (Web (fair-use with source credit))
The orange cables are your biggest visual cue. If you see orange, don't spray it. Period.
Those cables are part of the high-voltage system, and while they're insulated, the connectors where they join other components are the weak points. Water can wick into those connectors and cause corrosion that's invisible until it fails.
The Golden Rule: Low Pressure, High Caution
Here's the single most important rule for washing the Sealion 6 engine bay: never use a pressure washer. Not even on a low setting. Not even from a distance.
Just don't do it.
The recommended PSI for washing cars is typically 1200 to 1900 PSI for exterior paint. That's already enough to damage trim and force water past seals. For the engine bay, you want to stay well below that.
Manufacturer specifications for hybrid engine bays generally recommend nothing above garden hose pressure, which is about 40 to 60 PSI.
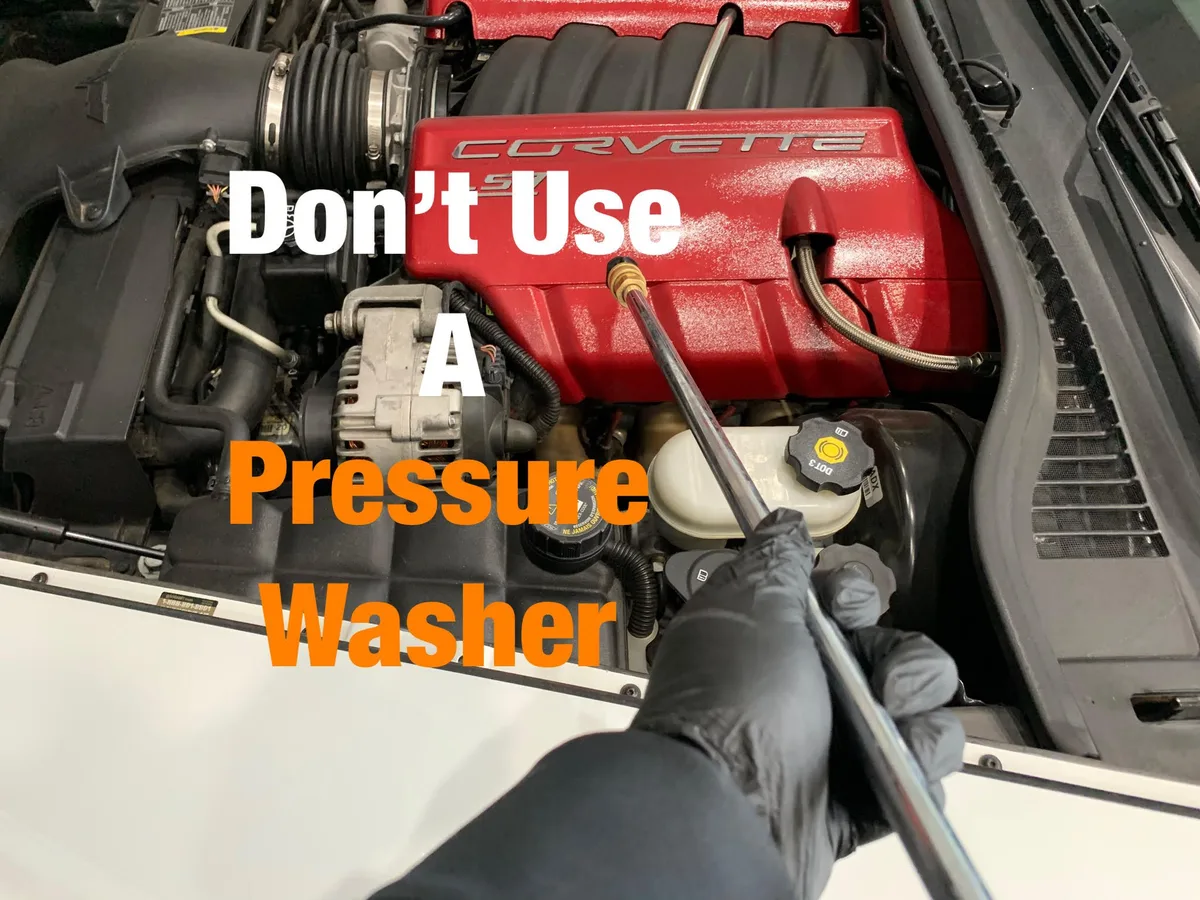
Image source: Bing (Web (fair-use with source credit))
Why such a big difference? A pressure washer doesn't just wet things. It forces water into gaps that gravity and surface tension would normally protect.
The seals on hybrid connectors are designed to handle rain and road splash, not a concentrated jet of water at 1500 PSI. Once that seal is breached, water sits inside the connector and starts corroding the pins.
If you absolutely must use a pressure washer, keep the nozzle at least two feet away and use a wide spray pattern. But honestly, a garden hose with a spray nozzle set to a gentle shower is safer and does the job just fine. The goal is to wet the surfaces, not blast them clean.
Step-by-Step: How to Wash the Engine Bay Safely
Now let's get into the actual process. This method aligns with what BYD service centers recommend and what experienced hybrid detailers use. Take your time.
Rushing is where mistakes happen.
Step 1: Pre-Wash Inspection and Prep
Start with the engine cold. A hot engine plus cold water can crack components, and it's not safe to work around hot surfaces. Pop the hood and do a visual inspection.
Look for any loose connectors, cracked hoses, or exposed wiring. If you see anything that looks damaged, don't wash it. Take it to a mechanic first.
Remove any loose debris by hand. Leaves, twigs, and dead bugs can trap moisture and cause corrosion. A soft brush or compressed air works well here.
Also remove the plastic engine cover if it's easy to take off. On the Sealion 6, it usually just pulls up. This lets you clean underneath where dirt and grime accumulate.
Step 2: Covering the No-Go Zones
This is the most important step. You need to physically protect the sensitive components. Use plastic bags and rubber bands or painter's tape to cover:
- The air intake opening
- The fuse box
- The ECU and any exposed control modules
- The alternator/motor-generator unit
- Any open connectors or wiring harness junctions
Don't forget the battery. If your Sealion 6 has the 12V battery under the hood, cover it. Even though it's low voltage, water in the terminals can cause corrosion and starting issues.
Take your time with this step. A five-minute prep job can save you a thousand-dollar repair bill.
Step 3: Applying Cleaner the Right Way
Use a dedicated engine bay cleaner that's pH-neutral and safe for aluminum and plastics. Avoid harsh degreasers that can damage rubber seals and plastic components. Spray the cleaner onto the surfaces, not directly into connectors or openings.
Let the cleaner dwell for three to five minutes. Don't let it dry. If it starts to dry, mist it with water to keep it active.
Use a soft brush to agitate stubborn grime. A detailing brush set with different sizes helps you reach into tight spots without scratching anything.
Step 4: Gentle Rinse Technique
This is where most people mess up. Use a garden hose with a spray nozzle set to a wide, gentle shower. Start from the top and work your way down.
Let the water flow naturally rather than blasting it. The goal is to rinse away the cleaner and loosened dirt, not to force water into every crevice.
Avoid spraying directly at the covered components. Even with covers on, a direct stream can find its way past your protection. Keep the spray angle downward and let gravity do the work.
Step 5: Drying Like Your Warranty Depends On It
Drying is just as important as washing. Moisture left sitting in crevices will cause corrosion and electrical issues. Start by removing the plastic covers from the sensitive components.
Then use compressed air to blow water out of connectors, crevices, and around the fuse box.
A leaf blower works great for this. So does a dedicated car drying blower. Follow up with a clean microfiber towel to wipe down accessible surfaces.
Pay special attention to areas where water pools, like around the hood latch, battery tray, and plastic trim edges.
Let the hood stay open for at least 30 minutes before closing it. This allows any trapped moisture to evaporate. If you can, park in the sun or in a warm garage to speed things up.
Step 6: Post-Wash Check and Test Drive
Before you drive, do a final visual check. Make sure all covers are back in place, all connectors are seated, and nothing looks out of place. Start the engine and let it idle for a few minutes.
Check for any warning lights on the dashboard.
Take a short test drive and listen for any unusual sounds. If everything seems normal, you're good to go. If you see a warning light, don't panic.
Sometimes moisture on a sensor can trigger a temporary fault. Let the car dry out overnight and see if it clears. If it doesn't, take it to a dealer.
Products That Are Safe for Hybrid Engine Bays
Not all cleaning products are created equal. Some degreasers are too aggressive for the plastics and seals in a hybrid engine bay. Here's what to look for and what to avoid.
Safe products:
- pH-neutral all-purpose cleaners
- Water-based degreasers (low VOC)
- Dedicated engine bay cleaners from reputable brands
- Isopropyl alcohol (for spot cleaning, diluted 50/50 with water)
Products to avoid:
- Solvent-based degreasers (can damage plastic and rubber)
- Brake cleaner (too aggressive, can strip protective coatings)
- Simple Green full-strength (can corrode aluminum if left too long)
- Dish soap (can strip protective coatings and leave residue)
If you're using a foam gun, make sure the shampoo is designed for automotive use. The right car wash shampoo in a foaming gun can work well for engine bays, but keep the dilution ratio higher than you'd use for the paint. You want enough cleaning power to cut through grime without being aggressive enough to damage components.
For the plastic trim and hoses, a dedicated dressing can restore the factory look. Just make sure it's water-based and doesn't leave a greasy residue that attracts dust. Silicone-based dressings can cause rubber hoses to swell and crack over time, so avoid those.
Mistakes That Will Cost You Thousands
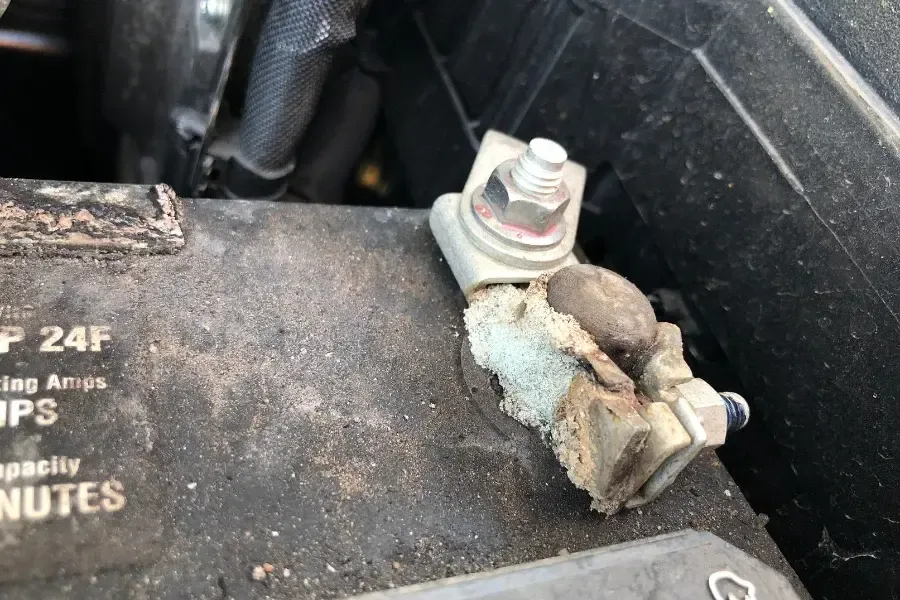
Image source: Bing (Web (fair-use with source credit))
Let's talk about the mistakes that actually hurt. These aren't hypothetical. They're real problems that hybrid owners have dealt with, and they're expensive.
Mistake 1: Using a pressure washer. A pressure washer can force water past seals that are designed for splash resistance. Once water gets into a high-voltage connector, corrosion starts. Replacing a wiring harness on a hybrid can run into the thousands.
Mistake 2: Spraying directly at the alternator or starter generator. These units are expensive and sensitive. Water intrusion can cause bearing failure or electrical shorts. Replacement costs for hybrid motor-generator units often exceed $1500.
Mistake 3: Ignoring the air intake. Water in the intake can cause hydrolock, which bends connecting rods and destroys the engine. This is a catastrophic failure that requires a full engine replacement. Always cover the intake opening before washing.
Mistake 4: Using harsh chemicals. Solvent-based degreasers can damage the plastic engine cover, rubber hoses, and wire insulation. Once the insulation is compromised, you're looking at potential short circuits and electrical fires.
Mistake 5: Not drying thoroughly. Moisture trapped under the engine cover or in connectors will cause corrosion over time. It might not show up for months, but when it does, it's often too late to fix without replacing parts.
Mistake 6: Washing with the engine hot. Thermal shock can crack components, and hot surfaces can cause cleaning products to evaporate too quickly, leaving residue. Always let the engine cool completely before washing.
If you're unsure about any of this, it's worth checking what you should remove before washing the engine. Some components are easier to take off than to protect in place, and knowing which ones to remove can save you a lot of hassle.
When to Let a Pro Handle It
Not every engine bay wash is a DIY job. There are situations where paying a professional is the smarter move.
If you've never opened the hood of a hybrid before, start with a pro. The learning curve is steep, and one mistake can cost more than a decade of professional cleanings. A certified hybrid detailer knows exactly which components to avoid and how to dry everything properly.
You should also consider a pro if your engine bay is heavily soiled. Caked-on grease, oil leaks, or years of accumulated grime require stronger cleaning methods. Professionals have steam cleaners and specialized degreasers that work better than anything you can buy off the shelf.
They also have compressed air systems that dry every crevice completely.
The cost is reasonable. Professional hybrid engine bay detailing runs between $75 and $150 depending on your location and the level of service. Compare that to the potential cost of a damaged ECU or corroded high-voltage connector, and it starts to look like a bargain.
If you do go the DIY route, start with a light cleaning. Get comfortable with the layout and the process before tackling a deep clean. And always err on the side of caution.
When in doubt, cover it up or leave it alone.
How Often Should You Clean Under the Hood?
Frequency depends on your driving conditions. For most Sealion 6 owners, once every six to twelve months is plenty.
If you drive on dirt roads regularly, you might need to clean it more often. Dust and mud can build up on components and trap moisture. The same goes for areas with heavy road salt in winter.
Salt is corrosive, and leaving it on metal parts will cause rust over time.
Here's a simple guideline:
- Normal driving (paved roads, moderate climate): Every 12 months
- Frequent dirt or gravel roads: Every 6 months
- Winter salt exposure: Every 6 months, with a thorough rinse in spring
- Visible grime or oil leaks: Clean as needed, but address the leak first
Don't overdo it. Cleaning too often increases the risk of water intrusion. Each time you open the hood and spray water around, you're introducing moisture into a system that prefers to stay dry.
Stick to the schedule and only clean when it's actually needed.
A quick visual inspection between washes is a good habit. Pop the hood every few months and look for signs of trouble. Rodent nests, cracked hoses, and loose connectors are easier to fix when you catch them early.
A clean engine bay makes these inspections much easier.
The Bottom Line: One Simple Rule to Remember
Treat the Sealion 6 engine bay like an electronics lab, not a garage floor. Low pressure, gentle cleaners, thorough drying, and lots of common sense.
The orange cables are your warning system. If you see them, don't spray. Cover the sensitive bits, use a garden hose instead of a pressure washer, and take your time drying everything out.
That's really the whole formula.
As of 2026, the Sealion 6 is one of the most popular plug-in hybrids on the market. It's a well-engineered vehicle that rewards careful maintenance. Treat the engine bay with the respect it deserves, and it will serve you well for years to come.
If you're looking for the right tools to get the job done, check out our guide on the best water spray gun for car wash. A good sprayer with adjustable pressure makes a real difference. And if you're dealing with hard water in your area, a hard water softener for washing cars can prevent mineral deposits from forming on engine components.
One last thing. If you ever find yourself wondering whether a particular component is safe to spray, the answer is no. Cover it.
Walk away. Come back when you're sure. That cautious mindset is what separates a successful engine bay wash from an expensive lesson.