You’re right to assume the engine wash is simple. Grab a pressure washer, spray some degreaser, rinse, and you’re done. But what should we remove before washing the engine?
That question separates a clean bay from a costly mistake. If you skip the prep, you can short-circuit your alternator, soak your air filter, or even send water where it locks your engine solid.
Manufacturer specifications vary by model, but the general rule is consistent: any component that’s not fully sealed against moisture needs protection. As of 2026, most modern vehicles have sensitive electronics under the hood that can’t handle a direct blast from a pressure washer. Our research shows that taking five extra minutes to remove or cover a few key parts can save you hundreds, or thousands, in repairs.
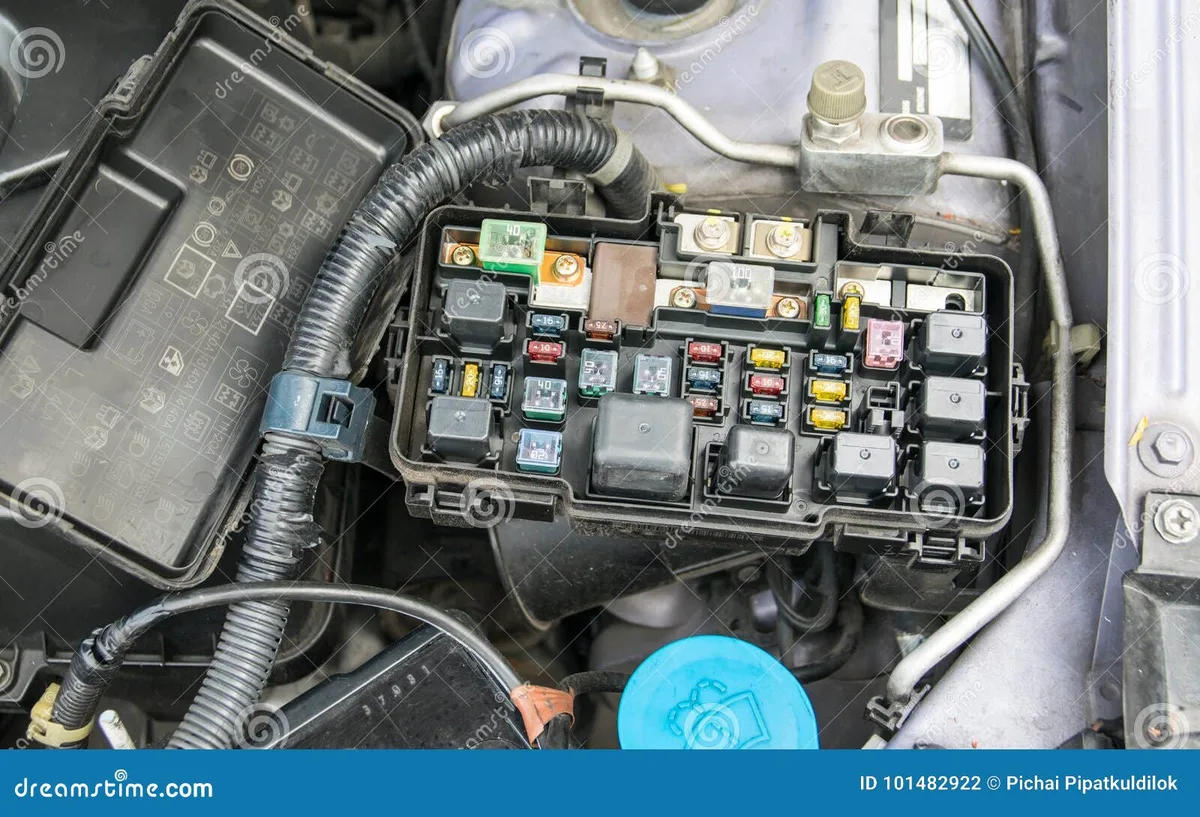
Image source: Bing (Web (fair-use with source credit))
Why Getting This Right Actually Matters
Water damage under the hood isn’t always instant. Sometimes it shows up days later as a rough idle, a check engine light, or a no-start condition. That’s because water can seep into connectors, corrode pins, or pool inside a component that wasn’t designed to get wet.
The real risk? Hydrolock. If water enters your engine’s intake, it can’t compress like air does.
Turning the key bends rods and cracks pistons. That’s a full engine replacement, not a simple fix.
Beyond the big failures, there are smaller annoyances. Wet spark plug wells cause misfires. A soaked alternator can fail prematurely.
Even a wet fuse box can blow fuses or damage the body control module.
In our research, experienced mechanics emphasize that preparation is the cheapest insurance you can buy. Spending ten minutes on removal and bagging costs nothing compared to the parts and labor you’d pay for a mistake.
The Quick Answer: What to Remove Before Washing Your Engine
Here’s the straightforward list. Remove or fully seal these parts before any water touches the engine bay:
- Battery, Especially if terminals are exposed. Bag it or disconnect and remove it.
- Alternator, It has ventilation slots. Water kills the bearings and diodes.
- Fuse box, Water inside causes shorts and corrosion. Pop the cover and seal the box.
- ECU / PCM, Often mounted near the firewall or fender. Water intrusion means a $1,000+ replacement.
- Air intake, The air filter box and intake hose. Even a splash can carry water to the engine.
- Mass airflow sensor, Delicate and expensive. Remove or cover its connector.
- Spark plugs / ignition coils, If your plugs sit in deep wells, water pools there.
- Oil dipstick and oil filler cap, Simple, but water can enter through a loose cap.
Each of these is vulnerable in its own way. We’ll cover exactly how to handle them in the step-by-step section.
Which Components Are Most Vulnerable to Water Damage
Not all parts are equal risk. Some are forgiving if they get a little mist. Others are one splash away from failure.
Image source: Bing (Web (fair-use with source credit))
Alternator
The alternator is the most commonly damaged part from engine washing. It draws air through vents to cool itself. Direct spray pushes water into the brushes, voltage regulator, and bearings.
Even if it survives the wash, dried-on soap residue can cause corrosion later.
Fuse Box
Modern cars have multiple fuse boxes. The main one under the hood is rarely sealed. Water inside creates path-to-ground shorts.
That can kill your headlights, fuel pump, or ECU overnight.
Battery Terminals
If your battery terminals are exposed, water mixed with road grime creates a slow electrical leak. It drains your battery and corrodes the connections. At minimum, you’ll get a no-start the next morning.
Mass Airflow Sensor (MAF)
This sensor sits right after the air filter. It’s a thin wire encased in plastic. Water splashing onto it can ruin its calibration.
You’ll notice rough idling, poor gas mileage, or a check engine light.
Air Intake
The air intake is the biggest single risk. A direct shot from a pressure washer into the intake snorkel can fill the air filter housing with water. From there, it goes straight into the throttle body and cylinders.
That’s hydrolock territory.
Ignition Components
On many engines, spark plugs sit in deep tubes. Water collects there and causes misfires. Coil packs can crack from thermal shock if the engine is still warm.
Step-by-Step: How to Remove, Bag, and Protect Sensitive Parts
This process works for any car. Adjust based on your specific layout. Always check your owner’s manual first, some manufacturers explicitly prohibit pressure washing the engine.
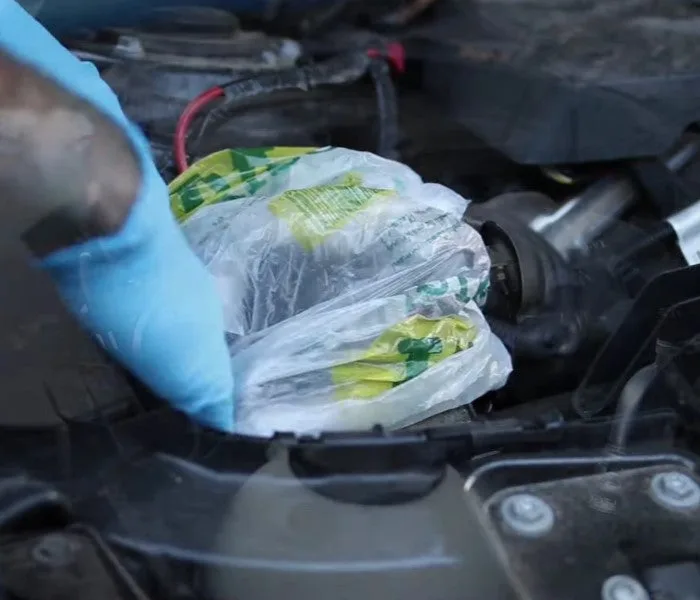
Image source: Bing (Web (fair-use with source credit))
Step 1: Let the Engine Cool Completely
A hot engine and cold water don’t mix. Thermal shock can crack aluminum components. Let it sit for at least an hour after driving, overnight is safer.
Step 2: Remove or Bag the Battery
If your battery is easily accessible, disconnect the negative terminal first, then the positive. Lift it out. If it’s hard to remove, cover the entire top with a plastic bag and seal it around the base with tape or a rubber band.
Step 3: Protect the Alternator
Wrap a plastic bag around the alternator body. Secure it with a zip tie or tape. Make sure the bag covers the vents and the electrical connector.
Do not cut the bag to fit, just tuck it.
Step 4: Seal the Fuse Box
Open the cover. Place a plastic bag inside the box, then close the lid over it. That keeps water out of the sockets.
For extra protection, put another bag over the entire box and tape it shut.
Step 5: Remove or Cover the Air Intake
If your air filter housing is sealed with clips, open it and remove the filter. Stuff a dry rag into the intake tube, then close the housing. Do not forget to remove the rag after washing.
Some people use a plastic bag over the intake snorkel, that works too.
Step 6: Protect the MAF Sensor
If your MAF sensor is external, unplug its connector and cover the plug with a small bag. If it’s inside the intake tube, the rag trick above protects it automatically.
Step 7: Cover the Dipstick and Oil Cap
These seem minor, but water can run down a loose dipstick tube or seep under a worn oil cap. Wrap a rubber band around a small plastic bag and fit it over each one.
Step 8: Bag the Spark Plug Wells
If your spark plugs are accessible, remove the coils or wires. Stuff a dry rag into each well. Alternatively, cover the entire valve cover with a plastic sheet.
Step 9: Wash Gently
Use a low pressure setting on your pressure washer, under 1200 PSI, and a wide fan spray. Keep the nozzle at least 12 inches from any component. Work from top to bottom.
Avoid blasting directly at any bagged part.
Step 10: Dry and Remove Bags
Remove all bags and rags. Use compressed air to blow out any water from crevices and connector pockets. Start the engine and let it idle for 10, 15 minutes.
The heat will evaporate remaining moisture.
Common Mistakes That Can Cause Hydrolock or Electrical Failure
Even with good intentions, people make these errors. Here are the ones to avoid.
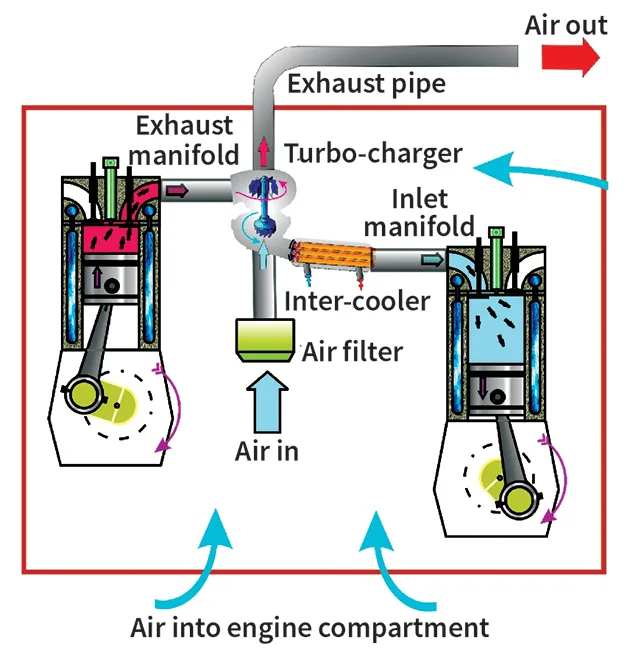
Image source: Bing (Web (fair-use with source credit))
Mistake 1: Washing a Hot Engine
It’s the top cause of cracked components and sudden electrical shorts. Wait until the engine is stone cold.
Mistake 2: Using Full Pressure on a Pressure Washer
A 2000 PSI jet can force water past seals you thought were safe. A standard garden hose with a spray nozzle is safer. If you must use a pressure washer, keep the pressure low and the spray pattern wide.
Mistake 3: Forgetting to Remove the Rag from the Intake
Sounds obvious, but it happens. People stuff a rag in the intake tube, wash the engine, and then start the car. The rag gets sucked into the throttle body.
That’s an immediate no-start and a trip to the shop.
Mistake 4: Spraying Directly Into Electrical Connectors
Even sealed connectors can fail if you blast water straight into them. Always angle the spray downwards and away from connectors.
Mistake 5: Not Drying Thoroughly
Water trapped inside connectors causes slow corrosion. Use compressed air to blow out every connector you see. If you don’t have compressed air, let the engine idle for 20 minutes with the hood open.
Mistake 6: Using Harsh Degreasers on Rubber and Plastic
Some degreasers attack rubber hoses and plastic coatings. Stick to pH-neutral cleaners or ones labeled safe for automotive use. Always dilute according to the instructions.
Mistake 7: Washing Too Often
You don’t need to clean your engine bay every month. Over-washing exposes components to unnecessary moisture. Once or twice a year is plenty for a daily driver.
When to Skip the Pressure Washer – Safer Alternatives
Not every engine needs a full pressure wash. In fact, some should never get one. If you drive a classic car, a performance vehicle with exposed intakes, or any engine with unsealed electronics, the risks outweigh the benefits.
Steam cleaning is the safest alternative. Steam uses high temperature and low moisture. It cleans grease without soaking components. Many professional detailers offer steam cleaning for around $75 to $150.
The cost is worth it if you have a sensitive engine bay.
Waterless engine cleaners are another option. These spray-on, wipe-off products lift dirt without any rinse. They work best for light dust and grime, not caked-on oil. You can find them at most auto parts stores.
Our research shows they are ideal for maintenance between deeper cleanings.
Manual degreasing with a brush and rags is the safest method for high-risk engines. Spray a pH-neutral degreaser on a cold engine. Agitate with a soft brush.
Wipe with microfiber cloths. It takes longer, but it eliminates water intrusion entirely.
Here is a quick decision guide:
| If your engine is… | Recommended method |
|---|---|
| Modern (2010+) with sealed electronics | Low-pressure rinse with bags |
| Classic / vintage with exposed wires | Manual degrease only |
| Performance with open intakes | Steam clean or manual |
| Daily driver with light dust | Waterless cleaner |
If you are unsure, start with the gentlest method. You can always go more aggressive on the next wash.
Safety, Warranty, and Legal Warnings You Should Know
This section covers the non-negotiable rules. Ignoring them can cost you much more than a repair bill.
Never Wash a Hot Engine
It is the single most repeated warning from mechanics. A hot engine expands metal parts. Cold water causes rapid contraction.
That can crack cylinder heads, intake manifolds, and exhaust components. Wait until the engine is completely cool to the touch. An hour is minimum.
Overnight is best.
Check Your Owner’s Manual
Some manufacturers explicitly forbid pressure washing the engine. For example, certain German luxury brands and high-performance models warn against it in writing. Ignoring that warning can void your powertrain warranty.
Look in the maintenance section of your manual. If it says “do not pressure wash,” follow it.
Water Damage and Warranty Claims
If water enters a sealed electronic module, the repair is usually not covered under warranty. Manufacturers classify water intrusion as “customer-induced damage.” That means you pay out of pocket. We have seen claims denied for soaked ECUs and corroded fuse boxes.
Environmental Regulations
Engine wash runoff contains oil, grease, and chemical cleaners. It should not go into storm drains. In many areas, washing a car on the street is illegal because of this.
Check local laws. If possible, wash on gravel or grass, or use a commercial car wash bay that captures runoff.
Pro Tips from Mechanics to Keep Your Engine Bay Safe
These are the tricks experienced mechanics use. They are not in the manual, but they make a real difference.
Use dielectric grease on connectors after drying. It seals out moisture and prevents corrosion. Apply a thin coat to the inside of every electrical connector you uncover before reconnecting.
Blow out moisture with compressed air. A leaf blower works in a pinch. Target every connector, sensor, and crevice. If you skip this step, trapped water will cause intermittent electrical problems.
Start the engine immediately after drying. Idle it for 15 minutes with the hood open. The heat evaporates any moisture you missed. Do not drive it hard until the engine reaches full operating temperature.
Wipe down rubber seals and hoses with a protectant. UV and degreasers dry out rubber. A quick wipe with a silicone-based protectant keeps them flexible and prevents cracking.
Label everything before you remove it. If you disconnect multiple sensors, use painter’s tape and a marker. A mixed-up connector can trigger a check engine light.
Never use a metal brush on the engine block. It scratches aluminum and steel. Use a soft-bristle nylon brush or a detailing brush. Metal brushes leave grooves where dirt and moisture accumulate.
Frequently Asked Questions
Can I pressure wash my engine without removing anything?
No. You risk damaging the alternator, fuse box, air intake, and sensors. At minimum, bag the key components.
Our research shows that even a gentle rinse causes issues when nothing is protected.
How long does an engine bay take to dry after washing?
It depends on temperature and airflow. With compressed air and a 15-minute idle, most moisture evaporates in under 30 minutes. Without compressed air, let it idle for 20 to 30 minutes with the hood open.
What PSI is safe for washing an engine?
Keep the pressure washer at 1200 PSI or lower. Use a wide fan spray nozzle. Never use a pinpoint jet.
If your washer has adjustable pressure, set it to the lowest setting.
Can I use a garden hose instead of a pressure washer?
Yes. A garden hose with a spray nozzle is safer. It delivers less pressure and less volume.
It takes longer to rinse soap, but it reduces the risk of forcing water into seals.
Is it okay to wash a diesel engine the same way?
Diesel engines have the same vulnerable components. The difference is that diesel fuel systems run at higher pressures. Avoid spraying directly onto the high-pressure fuel pump and injector seals.
Otherwise, the same rules apply.
What should I do if water gets into the engine oil?
If you see milky oil on the dipstick after washing, do not start the engine. Water in oil causes severe bearing damage. Drain the oil immediately.
Change the filter. Run fresh oil for 10 minutes, then drain again. If the oil still looks milky, consult a mechanic.
Final Verdict: The Best Approach Based on Your Engine Type
The safest engine wash is the one that matches your specific car. There is no one-size-fits-all answer.
For modern vehicles (2010 and newer): Remove or bag the battery, alternator, fuse box, and air intake. Use a low-pressure rinse. Dry thoroughly.
This is the approach most mechanics recommend.
For classic or vintage cars: Skip the pressure washer entirely. Use manual degreasing with a brush and rags. If you must use water, use a spray bottle.
Do not soak anything.
For performance cars with aftermarket intakes: These often have exposed cone filters and unsealed ECUs. Use a steam cleaner or a waterless product. Pressure washing is too risky.
For daily drivers in good condition: Follow the full step-by-step guide. You get a clean engine bay that is easier to maintain. Just do not overdo it.
Once or twice a year is plenty.
In our research, the people who regret an engine wash are the ones who skipped the prep. The ones who take the extra ten minutes to remove and bag components? They never have a problem.
If you want to keep your engine bay clean without the risk, check out our guides on safe car cleaning products. The best grime remover for car paint works well on the exterior. For the engine bay, stick to the methods we covered here.
And if you need to tackle tar or bug residue after your wash, our best bug and tar remover spray for cars can help. Visit our blog for more detailed car care advice.