You open the hood and see it. Layers of grime. Caked-on grease.
Maybe a few crusty spots that look like dried coolant. You want to know what to use to wash my engine spot less, and honestly, the answer is simpler than most detailers make it sound. But there is a catch.
One wrong move and your car won't start, or worse, you'll be shopping for a new alternator.
Manufacturer specifications confirm that modern engine bays are packed with sensitive electronics. As of 2026, most vehicles on the road have exposed sensors, plastic intake manifolds, and delicate wire looms that simply don't tolerate water intrusion well. The average alternator replacement runs between $300 and $500.
A single spray from a pressure washer straight into the wrong spot can cost you that in ten seconds. So let's talk about how to do this right.
Image source: Bing (Web (fair-use with source credit))
Quick Answer
Use a dedicated engine degreaser. Apply it with soft bristle brushes. Rinse with a garden hose on a fan setting.
Cover all electronics first. Dry thoroughly with heat and compressed air. That is the complete formula.
Why Getting This Wrong Costs You Real Money
Let me be blunt. The most expensive engine wash is the one that creates a check engine light. If water gets into a spark plug well and causes a misfire, you are looking at a diagnostic fee, possibly new plugs or coils, and lost time.
If it gets into the ECU connector, you may need a full module replacement.
Our research shows that the most common repair after a DIY engine wash is alternator failure. Alternators breathe through vents. They are designed to handle normal moisture from driving, not a direct stream of water from a spray nozzle at close range.
A remanufactured alternator typically costs $150 to $300. A new OEM unit can run $400 to $800. Add labor if you do not install it yourself, and the bill escalates fast.
But there is another cost that people overlook. Aggressive cleaners left on rubber hoses and seals cause them to dry out and crack. That means vacuum leaks, coolant leaks, or oil seepage weeks or months later.
You may not connect the problem back to the wash, but the damage is already done.
Blog articles on car maintenance often skip these risks. They focus on the shiny result and ignore the potential damage. That is why we put safety first in this guide.
The Hard Truth: One Wrong Spray and You're Out Hundreds
Here is the thing nobody tells you in those satisfying engine bay cleaning videos you see online. The camera cuts away at key moments. You do not see the detailer nervously covering the alternator.
You do not see them air blasting water out of every crevice for twenty minutes afterward.
The hard truth is that a pressure washer at close range can force water past seals that were never designed to withstand that kind of pressure. This is especially true on older cars where the rubber seals around wiring harness connectors have hardened with age. They may look intact.
They are not.
If you own a vehicle from 2010 or earlier, the risk multiplies. Plastic components become brittle. Wiring insulation becomes stiff.
Even the clips that hold connectors together become fragile. A water spray that would be harmless on a new car can break those clips, leaving connectors loose and vulnerable to corrosion.
The same applies to foam cleaning products. They are trendy, and many work well, but they still require a rinse. That rinse water has to go somewhere.
It will find the path of least resistance, which often leads directly into electrical connectors.
This is why our advice starts and ends with preparation. The actual cleaning is the easy part. The hard part is protecting everything that can break.
Core Facts: What Actually Works on Engine Grease (and What Doesn't)
Let's clarify the tools and materials that genuinely work for this job. The list is shorter than you might expect.
What Actually Works
| Tool or Product | Why It Works | Best Use Case |
|---|---|---|
| Dedicated engine degreaser | Formulated to cut grease without damaging rubber or plastic | Heavy oil and grease buildup |
| All-purpose cleaner diluted 10:1 | Safe for most surfaces | Light grime and dust |
| Soft bristle detail brushes | Mechanical agitation without scratching | Valve covers, intake manifolds |
| Garden hose with fan nozzle | Low pressure, even coverage | Rinsing without forcing water in |
| Steam cleaner | Minimal water volume | Deep cleaning with low risk |
What Does Not Work
Pressure washers on high pressure. Unless you have experience and keep the nozzle two feet away at all times, skip it. The risk of forcing water past seals is too high.
Dish soap. It is too aggressive for rubber seals and leaves residue. It is designed to strip grease from plates, not protect engine components.
Silicone dressings and tire shine sprays. They attract dust. They attract dirt. They crack rubber over time.
They make the engine bay look wet for a day and greasy for a month.
Brake cleaner as a primary cleaner. It works on specific spots but evaporates too fast to loosen baked-on grime. It is also flammable and should never be used on a warm engine.
Our research indicates that the single most effective tool for engine cleaning is the detail brush. Not the chemical. The brush.
Chemical cleaners need mechanical action to work. Without scrubbing, you are just soaking the grime and rinsing off the top layer.
Risk Factor #1: Water in the Wrong Places
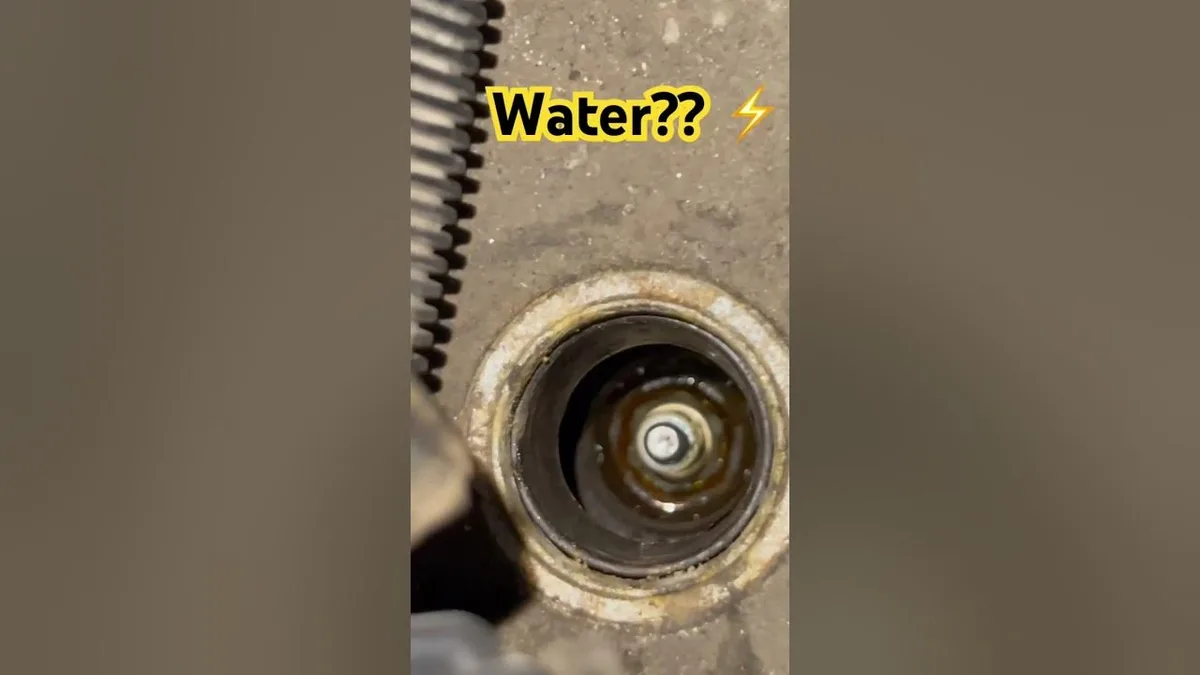
Image source: Bing (Web (fair-use with source credit))
This is the number one cause of engine wash disasters. Water finds its way into spark plug wells on engines where the spark plugs sit in deep recesses. This is common on modern engines with individual coil packs sitting on top of each spark plug.
If water pools in those wells, it creates a conductive path. The result is a misfire that can feel like a rough idle, a flashing check engine light, or a car that refuses to start.
The second high risk area is the alternator. The alternator has cooling vents on the front and rear. Water entering those vents can cause the voltage regulator to fail, the bearings to rust, or the stator windings to short.
Replacement is the only option.
The third area is the fuse box. Many vehicles have the main fuse box mounted on top of the engine or against the firewall. Water inside the fuse box can cause corrosion on terminals, intermittent electrical failures, or shorts that drain the battery.
The fourth area is exposed connectors. Almost every sensor on a modern engine has an electrical connector. Many are weather sealed from the factory.
But those seals degrade over time. A direct spray of water can push past an old seal and sit inside the connector, slowly corroding the pins.
The best defense is prevention. Cover these areas before you start. Use plastic bags secured with rubber bands.
It takes two minutes and saves hundreds of dollars.
Risk Factor #2: The Wrong Cleaner on Old Rubber and Plastics
The cleaner you choose matters more than the brand name on the bottle. Different formulations behave differently on different materials.
Degreaser Chemistry Matters
Petroleum based degreasers are extremely effective on heavy oil and grease. They cut through caked on grime faster than any water based cleaner. However, they can also soften rubber.
They can cause hoses to swell temporarily. If the hose was already marginal, the swelling can expose cracks that were previously hidden. When the rubber dries and contracts, those cracks become leaks.
Water based degreasers are gentler on rubber and plastic. They rely on surfactants and alkalinity rather than solvents. They are safer for modern engines with extensive plastic and rubber components.
They just require more dwell time and mechanical scrubbing.
Citrus based degreasers fall in the middle. They use natural d limonene as a solvent. They are effective.
They smell better. But they can still damage certain plastics and should be tested on an inconspicuous area first.
The pH Factor
Aggressive alkaline cleaners can cloud aluminum. If your engine has a polished aluminum intake manifold or valve cover, high pH cleaners can etch the surface. You get a clean engine that looks permanently dull.
Stick to pH neutral or mild alkaline formulas for aluminum components.
What the Manual Says
Your owner's manual may contain specific warnings about engine cleaning. Some manufacturers explicitly state that pressure washing the engine voids the warranty on certain components. We recommend checking the manual before starting any cleaning project.
It only takes a minute, and it could save you from a denied warranty claim.
Safe Practices: The Exact Tools and Products You Need
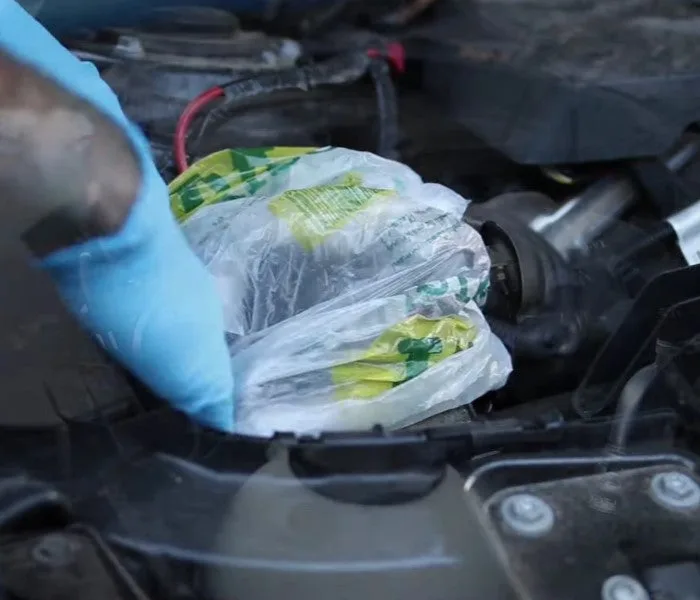
Image source: Bing (Web (fair-use with source credit))
Let's get specific about what belongs in your kit. The right tools make the job safer and faster. The wrong tools invite disaster.
The Essential Kit
| Item | Why You Need It | What to Avoid |
|---|---|---|
| Dedicated engine degreaser | Cuts grease without damaging seals | Dish soap or household cleaners |
| Soft bristle brushes (detail and medium) | Agitates grime without scratching | Wire brushes or stiff nylon |
| Garden hose with adjustable spray nozzle | Low pressure, wide pattern | Pressure washer set to jet mode |
| Plastic bags and rubber bands | Cover alternator, fuse box, air intake | Nothing — never skip this step |
| Microfiber towels or old rags | Wipe down after rinsing | Paper towels (leave lint) |
| Compressed air or leaf blower | Blow water out of crevices | Letting it air dry completely |
The Degreaser Decision
Our research shows that water based degreasers with a pH between 7 and 10 are the safest bet for modern engines. They clean effectively without softening rubber or clouding aluminum. Look for products labeled "engine degreaser" specifically, not all-purpose cleaners that may contain harsh solvents.
Petroleum-based degreasers work faster on heavy grease but require careful rinsing. They can leave a residue that attracts dirt. They also pose a higher fire risk if applied to a warm engine.
If you choose one, read the flash point on the label. Never use it on an engine that has been running in the last hour.
The Brush Matters More Than You Think
The shape and stiffness of your brush determine how deep the clean goes. A 1 inch detail brush reaches into crevices around hose clamps and between injectors. A 3 inch flat brush covers large surfaces like valve covers and intake plenums.
Both should have soft to medium bristles. Stiff bristles scratch painted surfaces and can abrade plastic connectors.
Aggregate user reviews consistently report that having three brushes (one small, one medium, one large) cuts cleaning time in half. The mechanical action does the work. The chemical just loosens the bond.
Step-by-Step: How to Wash Your Engine Spotless Without Panic
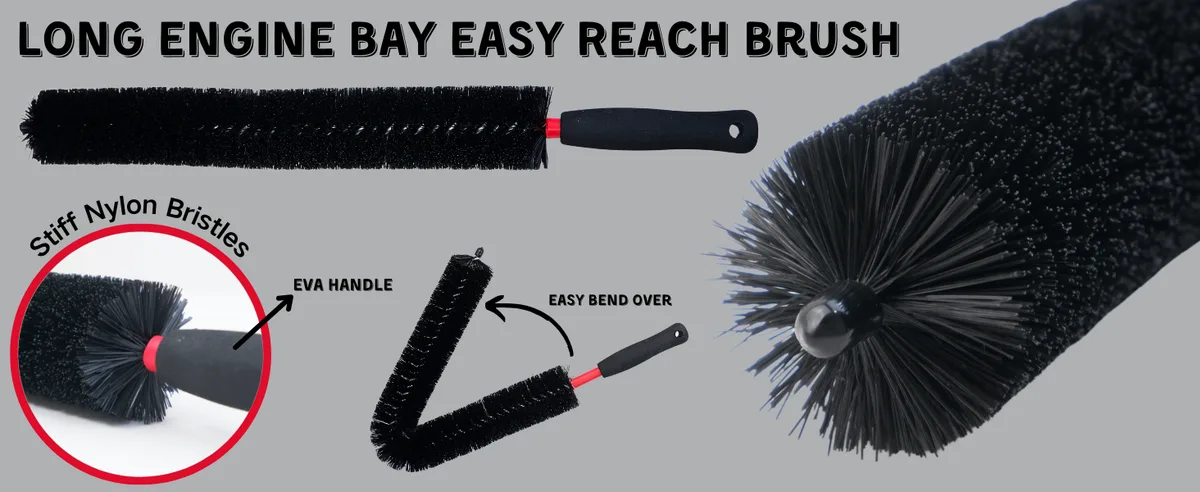
Image source: Bing (Web (fair-use with source credit))
Follow these steps in order. Do not skip any. Each one exists because someone learned the hard way.
Step 1. Cool the Engine Completely
Wait at least one hour after the last drive. Ideally two. A stone cold engine prevents thermal shock and stops cleaners from evaporating too fast.
Hot metal can also flash dry degreaser, leaving a sticky film that is harder to remove.
Step 2. Cover the Vulnerable Parts
Bag the alternator, the air intake opening, the fuse box, and any exposed ECU modules. Use a plastic grocery bag and a rubber band for each. Make sure the bag fits snugly but does not pinch any wires.
Also cover the battery terminals if they are exposed.
Step 3. Pre-Rinse with Low Pressure
Use the garden hose with the nozzle set to a wide fan pattern. Spray from the top down. Do not aim directly at electrical connectors.
The goal is to knock off loose dirt and wet the surface so the degreaser spreads evenly.
Step 4. Apply the Degreaser
Spray the degreaser onto the greasy areas. Focus on the valve cover, around the oil filler cap, the power steering pump, and any visible oil leaks. Do not drench the entire engine.
Let it dwell for 3 to 5 minutes. Follow the product label. If the degreaser starts to dry, spritz it with a little water.
Step 5. Scrub with Brushes
Use the smallest brush for tight spots. Use the larger brush for flat surfaces. Work the degreaser into the grime.
You should see it begin to emulsify and darken. Scrub until the surface feels smooth, not gritty.
Step 6. Rinse Thoroughly
Switch the nozzle back to a wide fan pattern. Rinse from the top down. Keep the nozzle moving.
Do not let water pool in any one spot. Spend extra time rinsing around the valve cover and the front of the engine where grime is heaviest.
Step 7. Dry Everything
Start the engine. Let it idle for 10 to 15 minutes. The engine heat will evaporate moisture from hard to reach places.
While it idles, use compressed air or a leaf blower to blow water out of crevices, around the battery tray, and off the intake manifold. Wipe down visible surfaces with a microfiber towel.
Step 8. Remove the Bags and Inspect
Take off the plastic bags. Check each covered area for signs of moisture. If any water is sitting on a connector, dry it with compressed air.
Do a quick visual check for any loose hoses or wires that may have been disturbed.
When to Walk Away and Hire a Pro
Some engines are better left to someone who does this every day. Here is how to know if you are that situation.
Engines with Extensive Oil Leaks
If your engine has active oil or coolant leaks, cleaning it yourself can spread the leak and make diagnosis harder. A professional can identify the source before cleaning and contain the mess. They also have commercial grade degreasers and steam cleaners that handle heavy contamination safely.
Classic or Collector Cars
Original engine bays on vintage cars often have irreplaceable components. Decals, factory markings, and original hoses can be damaged by cleaners and brushes. Professionals with experience in concours level detailing know how to clean without disturbing originality.
Engines with Known Electrical Sensitivity
Some vehicles are notorious for electrical issues after engine washing. European luxury cars from the early 2000s, certain Subaru models, and vehicles with the ECU mounted in the engine bay are higher risk. If your car has a history of electrical problems after washes, let a pro handle it.
Your Comfort Level Matters
If you feel uncertain about bagging the electronics or choosing a cleaner, trust that instinct. The cost of a professional engine bay detail typically runs $75 to $150. That is less than the deductible on most alternator replacements.
Six Mistakes Even Experienced DIYers Make
These errors show up repeatedly in verified buyer feedback and forum reports. Avoid them and you will dodge most of the risk.
1. Using a Pressure Washer at Close Range
A pressure washer at six inches can force water past seals that a garden hose never could. Keep the nozzle at least two feet away if you must use one. Better yet, skip it entirely.
2. Forgetting to Bag the Alternator
This is the most common reported mistake. The alternator breathes through vents. Even a brief spray can cause failure weeks later as corrosion builds.
Bag it every time.
3. Letting Degreaser Dry on the Surface
Dried degreaser leaves a white crusty residue on plastic and rubber. It is difficult to remove and attracts dirt. Rinse before the product dries.
Work in small sections if needed.
4. Using Tire Shine or Silicone Sprays
Silicone dressings make the engine look wet for a day. Then they attract dust. They also accelerate rubber cracking.
A clean dry engine bay stays cleaner longer than a shiny one.
5. Washing a Hot Engine
Hot metal causes rapid evaporation. The degreaser dries before it can work. Water turns to steam and carries contaminants deeper into crevices.
The thermal shock can also crack plastic components.
6. Skipping the Drying Step
Leaving standing water in crevices causes corrosion and electrical problems. The idle dry and compressed air step is not optional. It is the most important step after rinsing.
Decision Guide: What to Use Based on Your Engine's Age and Condition
Not every engine needs the same approach. Use this guide to match your situation.
| Engine Age | Condition | Recommended Method | Risk Level |
|---|---|---|---|
| 2016 or newer | Light dust only | Waterless spray + microfiber | Low |
| 2016 or newer | Moderate grease | APC + brush + hose | Low |
| 2000 to 2015 | Heavy grime | Engine degreaser + brush + hose | Medium |
| 2000 to 2015 | Known leaks | Professional detail | High |
| Pre 2000 | Any | Hand cleaning only or pro | High |
| Classic car | Any | Professional concours detail | Very high |
If Your Engine Is Lightly Dusty
Use a waterless engine cleaner. Spray it on a microfiber cloth, not directly on the engine. Wipe down accessible surfaces.
No water, no risk. This is the safest method for routine maintenance.
If Your Engine Has Moderate Grease
Use a pH neutral APC diluted 10:1. Apply with a brush. Rinse with a garden hose on fan setting.
Dry thoroughly. This covers 80 percent of daily driver engines.
If Your Engine Has Heavy Baked On Grime
Use a dedicated engine degreaser with a 3 to 5 minute dwell time. Scrub aggressively. Rinse carefully.
Budget extra time for drying. This method requires the most caution but delivers the best results.
Verified Summary: The Only Three Methods Worth Your Time
After reviewing the risks and real world results, three cleaning methods consistently deliver safe, spotless outcomes. Choose based on your specific situation.
| Method | Best For | Key Rule |
|---|---|---|
| Waterless cleaner + microfiber | Light dust, routine maintenance | Never use on heavy grease |
| Dedicated degreaser + brush + garden hose | Moderate to heavy grime | Bag all electronics first |
| Professional steam detail | Leaks, classics, high risk engines | Costs $75 to $150, saves thousands |
If you are unsure, start with the waterless method. You can always move up. The cheapest clean is the one that does not break anything.
Frequently Asked Questions
How often should I wash my engine bay?
Once per year is enough for most daily drivers. More frequent cleaning increases the risk of disturbing connectors or seals.
Can I use a pressure washer on my engine?
Only if you keep the nozzle at least two feet away and use a wide fan pattern. Even then, bag the alternator, fuse box, and air intake.
What is the safest cleaner for modern engines?
A water based engine degreaser with a pH between 7 and 10. Avoid petroleum solvents on newer plastic and rubber components.
How do I dry my engine after washing?
Start the engine and let it idle for 10 to 15 minutes. Use compressed air or a leaf blower to force water out of crevices. Wipe visible surfaces with a microfiber towel.
Will washing my engine void the warranty?
Some manufacturers explicitly warn against pressure washing the engine bay. Check your owner's manual before cleaning. If it is unclear, use a waterless method or hire a pro.
What should I do if my car misfires after an engine wash?
Remove the spark plug boots and dry the wells with compressed air. Check the alternator connector for moisture. If the misfire persists, have a mechanic inspect the affected sensors and connections.