ByMax Lee
Guide to Removing Maxi Cosi Car Seat Cover 2026
Parenting comes with enough messes without adding a stained car seat to the list. If you’ve ever tried removing maxi cosi car seat cover only to end up wrestling with hidden clips and a tangled harness, you’re not alone. The good news is that every Maxi Cosi cover is designed to come off, but the process is almost entirely visual.
One wrong yank and you could damage the harness path or break a plastic clip, and that’s not something you want to guess on.
As of 2026, Maxi Cosi produces over a dozen models across the Mico, Pria, and Cabriofix families, and while the general removal steps are similar, the exact location of clips, loops, and strap routing varies. In our research, the biggest difference between a smooth five-minute job and a frustrating twenty-minute fight comes down to knowing what you’re looking for before you start. That’s exactly what we’re going to walk through here.
Quick Answer
To remove a Maxi Cosi car seat cover, first unthread the harness from the splitter plate behind the seat. Unclip the chest clip and buckle from the fabric. Undo every elastic loop, snap, or hook under the shell.
Slide the cover off the headrest and foam pad. Wash cold, air dry only. Never remove the harness straps or soak them in water.
Why You Can’t Just Yank It Off – The Visual Side of Maxi Cosi Covers
The cover isn’t simply stretched over the seat like a pillowcase. Maxi Cosi engineers use a combination of plastic snap clips, elastic loops, and Velcro tabs that tuck between the foam padding and the hard plastic shell. If you pull without looking, you can tear a seam, snap a clip, or, worse, pull the harness strap out of its correct routing slot.
Each model has its own clip map. On a Pria 85 Max, for example, there are three elastic loops along the bottom edge and two Velcro strips near the hip area. On a Mico Max 30, the clips are all plastic snaps located inside the fabric channels around the headrest.
The takeaway? You need eyes, not force. A flashlight and a phone camera to peek underneath can save you a broken clip.
Before You Start: What You’ll Need (Spoiler: Almost Nothing)
You really don’t need much for this job. Here’s the short list:
- Your car seat manual, ideally the PDF from the Maxi Cosi website, because paper manuals get lost fast.
- A small flathead screwdriver or butter knife, only if a clip is stubborn, and even then, use it gently.
- A phone camera, to take a picture of the harness routing before you disassemble it. This step alone prevents the most common reassembly mistake.
- A gentle laundry detergent, free of bleach, fabric softener, and enzymes.
That’s it. No special tools. No screwdrivers needed for the shell itself.
Why the manual matters
Manufacturer specifications indicate that the removal method can differ between the same model from different production years. The 2019 Pria 70 uses J-hooks; the 2022 version uses plastic snap buttons. A generic video might show the wrong one.
The official PDF from Maxi Cosi is the only source that’s guaranteed correct for your serial number.
The Big Warning: Two Things You Must Never Do with the Straps
Before you touch anything, understand this: the harness straps are safety-critical components. They are not machine washable. They are not dip-in-water-and-scrub items.
Warning one: Never submerge the harness webbing in water. The nylon fibers can absorb moisture and weaken over time, especially if you use detergent. Spot-clean them with a damp cloth and mild soap. That’s it.
Warning two: Never remove the harness from the splitter plate unless you’ve memorized or photographed the order. The splitter plate (the metal bar behind the seat) holds the two shoulder straps and the crotch strap together. If you mix up the left and right straps, or thread them through the wrong slots, the harness won’t tighten evenly. A twisted or misrouted harness is a major safety issue.
Aggregate reviews from CPSTs (Child Passenger Safety Technicians) confirm that improper harness reassembly is the number one error after cover removal. Don’t be that person. Take the photo.
Step 1 – Getting to the Splitter Plate (The Hidden Metal Bar)
The splitter plate is usually tucked behind the seat, near the back panel. On most Maxi Cosi models, you’ll need to flip the seat over or remove a plastic access panel.
- For the Mico line: The splitter plate is behind a small fabric flap on the back of the seat. No tools needed.
- For the Pria line: You’ll see a rectangular plastic door on the back of the shell. Pry it open gently with your fingers.
- For the Cabriofix / Pebble: The splitter plate sits under a fabric sleeve at the back. Push the sleeve up to expose the metal bar.
Once you can see the splitter plate, you’ll notice the harness straps loop around it. Each strap end has a metal buckle that slides off when you push a small release button or squeeze the sides. Slide each strap off and tuck the ends back through the seat slots so you don’t lose them.
Don’t pull the straps completely out of the seat yet, you just need them detached from the plate so the cover can slide over the strap slots.
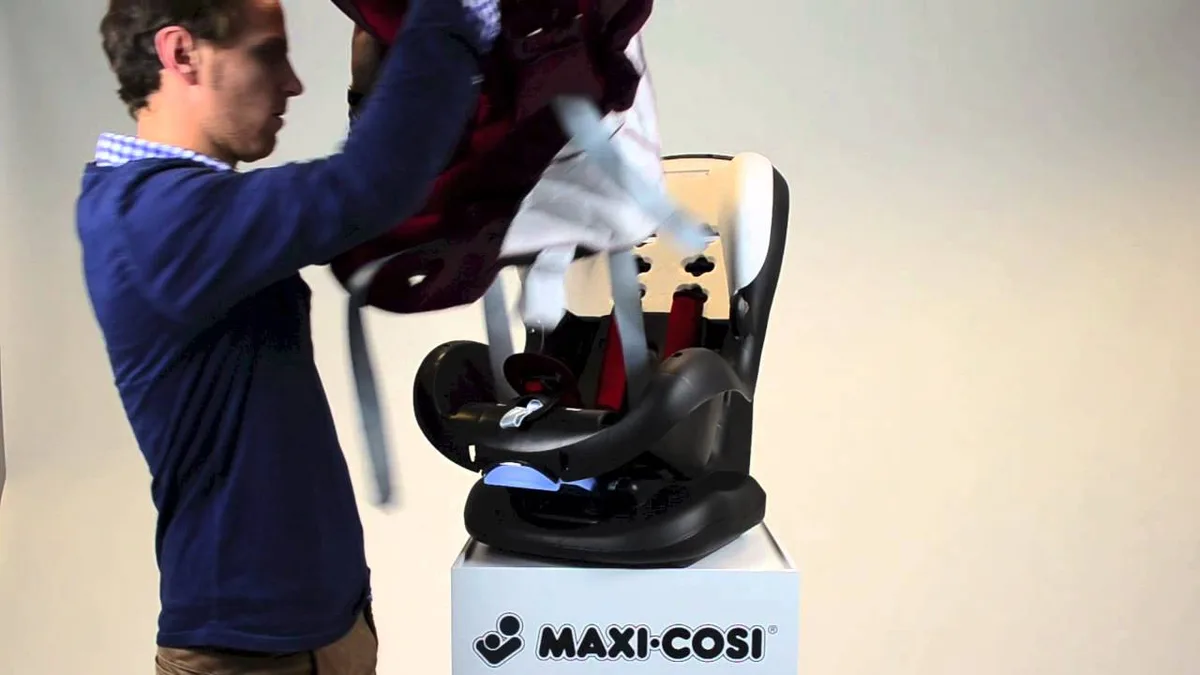
Step 2 – Unclipping the Harness from the Cover (Don’t Skip This)
With the splitter plate undone, flip the seat right-side up. Now you need to free the harness from the cover itself.
The chest clip and crotch buckle are attached to the fabric. On most Maxi Cosi models, the chest clip slides off a fabric loop when you squeeze the back tabs. The crotch buckle usually has a small fabric flap that you lift to unhook it from the strap.
Once the clip and buckle are free, pull the shoulder straps through the cover’s harness slots. The cover is still attached by its lower clips, but the straps are now out of the way.
Pro tip: Use your phone camera to snap a picture of exactly which slot each strap came from. The slots are often asymmetrical, and the left/right routing matters for proper fit.
If you’re cleaning a particularly stubborn stain, consider using a gentle upholstery cleaner on the plastic shell while the cover is off. Check out our guide on the best grime remover for car paint, it works on the shell’s hard surfaces too, just avoid the harness webbing.
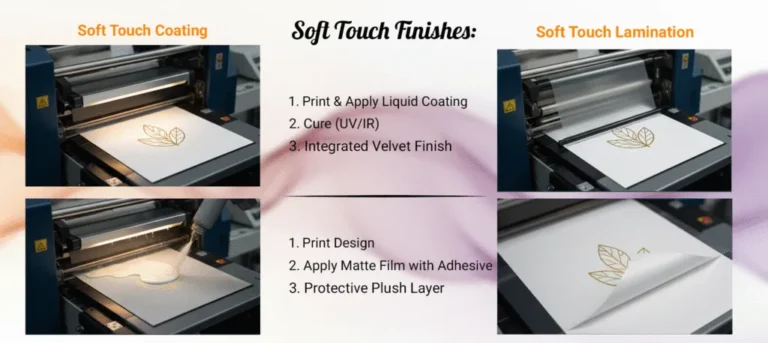
(Image for Step 3, clips and elastic loops will appear when we reach that section.)
Step 3 – Finding Every Clip, Hook, and Elastic Loop (Model-Specific Spots)
This is the part that trips most people up. The harness is free, the splitter plate is undone, but the cover still clings to the seat like it doesn’t want to leave. That’s because the real attachment points are hidden under the shell, between the foam, and along the edges.
Every Maxi Cosi cover uses a mix of plastic snap buttons, elastic bands with hooks, and Velcro tabs. Their exact location varies by model, so we’ve broken it down by the three main families.
Mico / Mico Max 30 / Mico XP
The Mico line has the simplest layout. Look under the seat shell near the front edge. You’ll find two plastic snap buttons on each side.
Unsnap them by pressing the center tab and pulling apart.
Behind the headrest, you’ll see two elastic loops that hook over plastic nubs on the shell. Pull the loops straight off. The cover then slides upward and off the foam pad.
One tricky spot: the fabric channel that wraps around the harness slot. You need to slide the cover out from between the shell and the foam, not yank it. Gently work it loose with your fingers.
Pria 70 / Pria 85 Max / Pria All-in-One
The Pria line uses more attachment points because of the larger seat and adjustable headrest. Start at the bottom edge. There are usually three elastic loops hooked onto the shell underside.
Reach under and feel for them.
Next, near the hip area, you’ll find Velcro strips that attach the cover to the foam pad. Peel them apart carefully. The Velcro is strong, but pulling too fast can tear the foam.
The headrest cover is often a separate piece. On the Pria 85 Max, a zipper runs along the back. Unzip it, then slide the headrest cover off the foam headrest pillow.
The main body cover then releases from the headrest channel.
Cabriofix / Pebble / Coral
These European-style seats have a different clip system. Instead of plastic snaps, they use metal J-hooks that fasten into slots on the shell. You’ll find two at the front and two at the back.
Insert a flathead screwdriver tip under the hook and gently pry it out. The hook snaps free with a click. Do not bend the hook.
If it resists, check you haven’t missed a strap routing that’s pinching the cover.
Once the J-hooks are off, the cover pulls forward off the infant insert. The harness slots will release the fabric automatically.
Step 4 – Sliding the Cover Off the Headrest and Foam
With all clips unfastened, the cover should be loose but not yet free. The final attachment is the headrest. On adjustable headrest models, you need to remove the headrest from the shell first.
Press the headrest release button (usually on the back) and slide the headrest up until it pops off the track. Now the cover can pass over the headrest pillar.
Work the cover downward off the foam pad. The foam is often shaped to hold the cover tight, so you may need to push the foam inward while pulling the fabric outward. Imagine peeling a tight sock off a foot.
If the cover resists, check for any missed hooks or Velcro. Don’t force it. Forcing can tear the seam where the harness slot meets the fabric.
Once the cover is off, set the foam pad aside. You’ll deal with it next.
Step 5 – Removing the Foam Pad and Infant Insert (If Present)
The foam pad sits inside the cover on most models. It provides structure and comfort. You don’t need to remove it for washing unless you want to clean the foam itself or the cover is stubbornly stuck.
If the foam pad has a separate fabric cover (common on Pria models), unzip it and remove the foam core. Wash the fabric cover with the main cover. The foam core should be spot-cleaned only with a damp cloth and mild soap.
Never machine wash the foam. It will disintegrate.
The infant insert (the smaller wedge for newborns) is usually attached by a strap that loops around the main cover. Unthread the strap from the buckle or slot, then pull the insert free. Wash it separately.
For the main foam pad: if it’s attached to the shell with Velcro, simply peel it off. Some models have a plastic clip that holds the foam to the shell. Unsnap it.
Now you have a completely bare car seat shell. This is a good time to wipe down the shell with a gentle cleaner. Avoid ammonia-based products.
Our guide on best bug and tar remover for vehicles works well for sticky residue on the plastic, but stick to a mild soap solution for the foam.
How to Wash It Without Ruining the Cover
You’ve got the cover off. Now comes the part that matters most: cleaning it safely.
Water Temperature, Detergent, and the No-Dryer Rule
Always wash the cover in cold water (30°C or cooler). Hot water can shrink the fabric and damage the elastic loops. Use a gentle cycle.
Detergent choices matter. Avoid anything with bleach, fabric softener, or enzymes. Fabric softener leaves a coating that can affect the cover’s flame-retardant properties.
A mild, free-and-clear liquid detergent is best.
| Do | Don’t |
|---|---|
| Cold water | Hot water |
| Gentle cycle | Heavy-duty cycle |
| Free-and-clear detergent | Bleach, softener, enzymes |
| Air dry only | Machine dryer |
Never put the cover in the dryer. The heat will shrink it, warp the elastic, and possibly melt the plastic snap buttons. Hang the cover over a drying rack or clothesline.
It can take 6 to 12 hours to dry fully, depending on humidity.
Turn the cover inside out before washing. This protects the outer fabric from abrasion and helps remove trapped crumbs.
For stubborn stains, pre-treat with a small amount of liquid detergent rubbed directly into the stain. Let it sit for 10 minutes before washing.
If you need to clean the harness straps, use a damp cloth with a tiny drop of mild soap. Wipe, then rinse with a damp cloth. Do not submerge.
For more general cleaning tips around the car, check out our blog.
Reassembly – Putting It Back Together the Right Way
Reassembly is the reverse of removal, but it requires patience. The most common mistake is rushing the harness routing.
Start by sliding the cover back over the foam pad. Insert the foam into the cover shell. Make sure all seams align with the harness slots.
Attach the headrest cover first if it’s separate. Then lower the main body cover over the headrest pillar. Refasten every clip, hook, and elastic loop you removed.
Work from the top down.
Reinstall the harness straps. This is where your photo from Step 2 comes in. Thread each shoulder strap through the correct slot.
Make sure the straps are not twisted. Attach each strap end to the splitter plate in the same order you removed them.
Snap the chest clip and crotch buckle back into their fabric loops. Give the cover a final tug to ensure all fasteners are secure.
Before putting the seat back in the car, check the harness for proper fit. Pull the adjustment strap. The harness should tighten evenly on both sides.
If one side is tighter, you may have crossed the straps on the splitter plate. Disassemble and redo.
One final safety check: ensure the cover is fully seated and not bunching anywhere. A bunched cover can interfere with the harness’s ability to hold your child snugly. It’s worth the extra minute to verify.
What to Do If a Clip Breaks or a Loop Tears
Plastic snaps and elastic loops can wear out over time. If a clip snaps off during removal, don’t panic. You have options.
First, check if the broken piece is a separate snap button or part of a molded tab. Separate snap buttons can be replaced. The Maxi Cosi customer service team can send a replacement part if you provide the model number and production date.
If an elastic loop tears, you can still use the cover. The loop just won’t hold as snugly. For a permanent fix, order an OEM replacement cover from the manufacturer.
Aftermarket covers are not crash-tested and may not fit the same way.
Never use superglue or tape to reattach a clip. That can interfere with the seat’s structural integrity. If the cover won’t stay in place without the clip, replace the whole cover.
It’s worth the cost for safety.
When You’re Better Off Leaving the Cover On (Spot-Cleaning Tips)
Full cover removal is ideal for deep cleaning. But sometimes you don’t need to go that far. If the stain is small and fresh, spot cleaning is faster and safer.
For milk spit-up or juice spills, blot the area with a damp microfiber cloth. Use a drop of mild dish soap if needed. Rinse by dabbing with a clean wet cloth.
Let it air dry.
For greasy stains like sunscreen or diaper cream, sprinkle baking soda on the spot. Let it sit for 15 minutes to absorb the oil, then brush it off. Wipe with a damp cloth.
Avoid rubbing the stain. Rubbing pushes it deeper into the fabric. Blot instead.
If the stain doesn’t lift after two attempts, it’s time to remove the cover and wash it. Stubborn stains set in over time. For tough residue on the plastic shell, our guide on best hard water spot remover for cars can help with mineral deposits, but test it on an inconspicuous area first.
Your Quick Reference: 7 Visual Cues to Check Before You Start
Before you touch the cover, look for these seven signs. They save time and prevent mistakes.
- Splitter plate access, Is it behind a panel or a fabric flap?
- Harness slot pattern, Are the slots symmetrical or staggered? Snap a photo.
- Clip type, Are they plastic snaps, elastic loops, or J-hooks? Look under the shell.
- Headrest attachment, Is it zippered, clipped, or a separate piece?
- Foam pad connection, Velcro, snap, or friction fit?
- Elastic loop count, How many loops are hooked under the seat?
- Model label, Locate the sticker under the shell for the exact model number.
If you can answer all seven, the removal will take under ten minutes. If you’re unsure about any one, check the manual first.
Still Stuck? Where to Find Your Exact Model’s Manual (Free PDFs)
Every Maxi Cosi model has a free PDF manual on the manufacturer’s website. Go to maxi-cosi.com and search by model name. The manual includes model-specific diagrams for cover removal and harness routing.
The model number is printed on a white sticker under the seat shell. It usually starts with “Mico”, “Pria”, or “Cabriofix”. The production date is also listed.
Match that to the correct manual.
If the website doesn’t have your specific year, call Maxi Cosi customer support. They can email you the correct PDF. Keep a copy on your phone for future reference.
One more resource: the NHTSA maintains a car seat registration database. You can check if your model has any recalls while you’re at it.
Frequently Asked Questions
Can I put the Maxi Cosi cover in the dryer?
No. The dryer will shrink the fabric and melt the plastic snap buttons. Always air dry the cover flat or on a drying rack.
It takes 6 to 12 hours depending on humidity.
Do I need to remove the harness straps to wash the cover?
No. You only need to detach the straps from the splitter plate and unthread them from the cover. Never remove the straps completely or submerge them in water.
How often should I wash the car seat cover?
Every three to six months for routine cleaning. Wash it sooner if there are spills, stains, or odors. Frequent washing is fine as long as you follow the cold water and air dry rules.
What if I can’t find the elastic loops under the seat?
Shine a flashlight under the shell from different angles. The loops are often tucked into crevices. Use a butter knife to gently lift the cover edge and expose them.
Is one cup of bleach safe to use on the cover?
No. Bleach damages the flame-retardant coating on the fabric. Stick to a mild free-and-clear detergent.
For tough stains, pre-treat with a small amount of the same detergent.